Este PDF no está enlazado desde ningún artículo publicado.
Página 1 — gswave_user_manual-1

Grandstream Networks, Inc. Grandstream Wave for AndroidTM User Guide
GRANDSTREAM WAVE USER GUIDE
Página 2 — gswave_user_manual-1
Grandstream Wave User Guide Index CHANGE LOG ........................................................................................... 6 FIRMWARE VERSION 1.0.1.2 .............................................................................................................. 6 WELCOME ................................................................................................. 7 FEATURE HIGHTLIGHTS ..................................................................................................................... 7 GRANDSTREAM WAVE TECHNICAL SPECIFICATIONS ................................................................... 7 GETTING READY.................................................................................................................................. 9 USING GRANDSTREAM WAVE .............................................................. 11 DIAL SCREEN ..................................................................................................................................... 11 DIALING A NUMBER DIRECTLY ................................................................................................. 11 REDIAL ......................................................................................................................................... 12 DIALING A NUMBER VIA CALL HISTORY .................................................................................. 13 DIALING A NUMBER VIA CONTACTS ........................................................................................ 13 SWITCHING AUDIO CHANNEL DURING CALL ................................................................................. 14 ANSWERING A CALL .......................................................................................................................... 15 SINGLE INCOMING CALL ........................................................................................................... 15 MULTIPLE CALLS ........................................................................................................................ 16 VOICE CALL ........................................................................................................................................ 17 CALL HOLD/RESUME ................................................................................................................. 19 MUTE ............................................................................................................................................ 19 SWITCHING AUDIO CHANNEL DURING CALL ......................................................................... 20 MISSED CALLS ................................................................................................................................... 21 CALL TRANSFER ................................................................................................................................ 23 BLIND TRANSFER ....................................................................................................................... 23 ATTENDED TRANSFER AFTER CALLING ................................................................................. 24 ATTENDED TRANSFER BEFORE CALLING .............................................................................. 24 6-WAY CONFERENCE ........................................................................................................................ 25 ADD NEW CONFERENCE .......................................................................................................... 27 INITIATING CONFERENCE ......................................................................................................... 27 REMOVING PARTICIPANT FROM CONFERENCE .................................................................... 29 MUTE/UNMUTE CONFERENCE ................................................................................................. 29 HOLD/RESUME CONFERENCE ................................................................................................. 30 VOICEMAIL ......................................................................................................................................... 31 CONTACTS.......................................................................................................................................... 33 ADD CONTACTS .......................................................................................................................... 35 Firmware Version 1.0.1.2 Grandstream Wave User Guide Page 1 of 64
Página 3 — gswave_user_manual-1

SEARCH CONTACTS .................................................................................................................. 35 VIEW CONTACT .......................................................................................................................... 36 EDIT CONTACT............................................................................................................................ 37 DELETE CONTACT ...................................................................................................................... 37 ADD CONTACT TO FAVORITES ................................................................................................. 38 CALL HISTORY ................................................................................................................................... 39 MESSAGES ......................................................................................................................................... 42 VIEW MESSAGE .......................................................................................................................... 43 CREATE NEW MESSAGE ........................................................................................................... 45 DELETE MESSAGE ..................................................................................................................... 45 SETTINGS ................................................................................................ 47 ACCOUNT SETTINGS ........................................................................................................................ 47 UCM ACCOUNT(QR CODE SCAN)............................................................................................. 47 UCM ACCOUNT (SCAN QR CODE IMAGE) ............................................................................... 48 SIP ACCOUNT ............................................................................................................................. 49 ADVANCED SETTINGS ...................................................................................................................... 55 GENERAL SETTINGS.................................................................................................................. 55 CALL SETTINGS .......................................................................................................................... 56 AUDIO SETTINGS ....................................................................................................................... 57 NETWORK SETTINGS ................................................................................................................ 57 ADDITIONAL SETTINGS ............................................................................................................. 57 CUTSOM SETTINGS .......................................................................................................................... 61 ABOUT VERSION ............................................................................................................................... 61 DEBUG ................................................................................................................................................ 61 EXIT ..................................................................................................................................................... 62 FAQs ........................................................................................................ 63 EXPERIENCING THE GRANDSTREAM WAVE APPLICATION .............. 64 Firmware Version 1.0.1.2 Grandstream Wave User Guide Page 2 of 64
Página 4 — gswave_user_manual-1
Table of Tables Grandstream Wave User Guide Table 1 GrandStream Wave Technical Specifications ................................................................................... 7 Table 2 Edit Account Parameters ................................................................................................................ 50 Table 3 Account Settings—General Settings Parameters .......................................................................... 51 Table 4 Account Settings—Call Settings Parameters ................................................................................. 51 Table 5 Account Settings—SIP Settings Parameters.................................................................................. 52 Table 6 Session Expiration Settings Parameters ........................................................................................ 52 Table 7 Account Settings—Network Settings Parameters .......................................................................... 53 Table 8 Account Settings—Codec Settings Parameters ............................................................................. 54 Table 9 Advanced Settings—General Settings Parameters ....................................................................... 55 Table 10 Advanced Settings—Network Settings Parameters ..................................................................... 57 Table 11 Advanced Settings—Additional Settings Parameters................................................................... 58 Table 12 LDAP Settings Parameters .......................................................................................................... 60 Table 13 Additional Settings Parameters .................................................................................................... 61 Table 14 Debug Settings Parameters ......................................................................................................... 61 Firmware Version 1.0.1.2 Grandstream Wave User Guide Page 3 of 64
Página 5 — gswave_user_manual-1

Table of Figures Grandstream Wave User Guide Figure 1 Grandstream Wave Installation ....................................................................................................... 9 Figure 2 Grandstream Wave Finger Gestures on the Touchscreen ........................................................... 10 Figure 3 Keypad Screen ............................................................................................................................. 11 Figure 4 Select Account .............................................................................................................................. 12 Figure 5 Dial-up via Call History ................................................................................................................. 13 Figure 6 Dial-up via Contacts ...................................................................................................................... 14 Figure 7 Switch Call Lines ........................................................................................................................... 15 Figure 8 Single Incoming Call ..................................................................................................................... 16 Figure 9 Multiple Calls ................................................................................................................................. 17 Figure 10 Voice Call .................................................................................................................................... 18 Figure 11 Call Unhold .................................................................................................................................. 19 Figure 12 Call Mute ..................................................................................................................................... 20 Figure 13 Call via Bluetooth ........................................................................................................................ 21 Figure 14 Missed Call Screen ..................................................................................................................... 22 Figure 15 Call Transfer—Blind Transfer...................................................................................................... 23 Figure 16 Attended Transfer After Calling—Transferring ............................................................................ 24 Figure 17 Attended Transfer before Calling—Split ...................................................................................... 25 Figure 18 Grandstream Wave Conference Screen ..................................................................................... 26 Figure 19 Grandstream Wave Conference—Add New Call to the Conference .......................................... 27 Figure 20 Grandstream Wave Conference—Initiating Conference ............................................................ 28 Figure 21 Grandstream Wave Conference—Delete Conference participant .............................................. 29 Figure 22 Grandstream Wave Conference—Mute Conference Participant ................................................ 30 Figure 23 Grandstream Wave Conference—Hold Conference .................................................................. 31 Figure 24 Configure Voicemail UserID ........................................................................................................ 32 Figure 25 Retrieve Voicemail ...................................................................................................................... 33 Figure 26 Grandstream Wave Contacts Screen ......................................................................................... 34 Figure 27 Grandstream Wave Add New Contact ........................................................................................ 35 Figure 28 Grandstream Wave Search Contact ........................................................................................... 36 Figure 29 Grandstream Wave View Contact ............................................................................................... 37 Figure 30 Grandstream Wave Edit Contact ................................................................................................ 38 Figure 31 Add Contact to Favorites ............................................................................................................ 39 Figure 32 Grandstream Wave Call History ................................................................................................. 40 Figure 33 Grandstream Wave Call History Details Screen ......................................................................... 41 Figure 34 Grandstream Wave Call History Details Screen- Edit Contact ................................................... 42 Figure 35 Grandstream Wave Messages Screen ....................................................................................... 43 Figure 36 Grandstream Wave Message Details Screen ............................................................................. 44 Figure 37 Grandstream Wave Create New Message ................................................................................. 45 Figure 38 Grandstream Wave Message Screen—Edit Message ............................................................... 46 Figure 39 Add New Account Screen ........................................................................................................... 47 Firmware Version 1.0.1.2 Grandstream Wave User Guide Page 4 of 64
Página 6 — gswave_user_manual-1
Figure 40 QR Code Scan Screen ............................................................................................................... 48 Figure 41 Scan QR Code Image Screen .................................................................................................... 49 Figure 42 Account Settings Screen—Registration Success ....................................................................... 50 Figure 43 Slide to Delete Account ............................................................................................................... 55 Figure 44 Call Settings Screen ................................................................................................................... 56 Figure 45 DND Settings Screen .................................................................................................................. 56 Figure 46 Reducing Noise Settings Screen ................................................................................................ 57 Figure 47 BLA List Screen .......................................................................................................................... 59 Figure 48 LDAP Settings Screen ................................................................................................................ 60 Firmware Version 1.0.1.2 Grandstream Wave User Guide Page 5 of 64
Página 7 — gswave_user_manual-1
CHANGE LOG
This section documents significant changes from previous versions of Grandstream Wave user manuals.
Only major new features or major document updates are listed here. Minor updates for corrections or editing are not documented here.
FIRMWARE VERSION 1.0.1.2
This is the initial version. Firmware Version 1.0.1.2 Grandstream Wave User Guide Page 6 of 64
Página 8 — gswave_user_manual-1
WELCOME
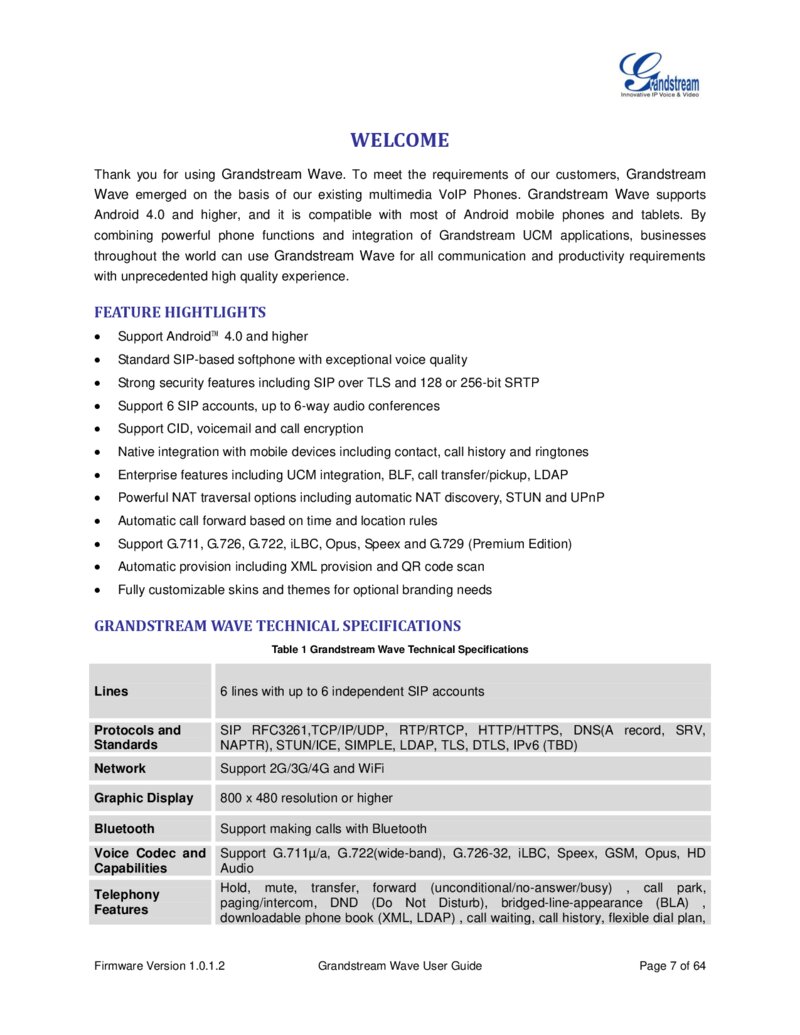
Thank you for using Grandstream Wave. To meet the requirements of our customers, Grandstream Wave emerged on the basis of our existing multimedia VoIP Phones. Grandstream Wave supports Android 4.0 and higher, and it is compatible with most of Android mobile phones and tablets. By combining powerful phone functions and integration of Grandstream UCM applications, businesses throughout the world can use Grandstream Wave for all communication and productivity requirements with unprecedented high quality experience.
FEATURE HIGHTLIGHTS
Support Android™ 4.0 and higher Standard SIP-based softphone with exceptional voice quality Strong security features including SIP over TLS and 128 or 256-bit SRTP Support 6 SIP accounts, up to 6-way audio conferences Support CID, voicemail and call encryption Native integration with mobile devices including contact, call history and ringtones Enterprise features including UCM integration, BLF, call transfer/pickup, LDAP Powerful NAT traversal options including automatic NAT discovery, STUN and UPnP Automatic call forward based on time and location rules Support G.711, G.726, G.722, iLBC, Opus, Speex and G.729 (Premium Edition) Automatic provision including XML provision and QR code scan Fully customizable skins and themes for optional branding needs
GRANDSTREAM WAVE TECHNICAL SPECIFICATIONS
Table 1 Grandstream Wave Technical Specifications Lines 6 lines with up to 6 independent SIP accounts Protocols and Standards SIP RFC3261,TCP/IP/UDP, RTP/RTCP, HTTP/HTTPS, DNS(A record, SRV, NAPTR), STUN/ICE, SIMPLE, LDAP, TLS, DTLS, IPv6 (TBD) Network Support 2G/3G/4G and WiFi Graphic Display 800 x 480 resolution or higher Bluetooth Support making calls with Bluetooth Voice Codec and Capabilities Support G.711µ/a, G.722(wide-band), G.726-32, iLBC, Speex, GSM, Opus, HD Audio Hold, mute, transfer, forward (unconditional/no-answer/busy) , call park, paging/intercom, DND (Do Not Disturb), bridged-line-appearance (BLA) , downloadable phone book (XML, LDAP) , call waiting, call history, flexible dial plan, Telephony Features Firmware Version 1.0.1.2 Grandstream Wave User Guide Page 7 of 64
Página 9 — gswave_user_manual-1
custom ringtones, server redundancy & fail-over, BLF UCM Integration Supports many functions like QR code scan Feature Functions LDAP, MWI (Message Waiting Indicator), display instant online status, call history and messages QoS Layer 3 (ToS, DiffServ, MPLS) QoS Security Support AES configuration file, TLS encryption, SRTP encryption (128-bit and 256bit) , HTTPS Multi-language English, Simplified Chinese, Polish, Germany, Russian, Italian, Arabic, Spanish, Portuguese, French, etc.
This document is subject to change without notice. The latest electronic version of this user manual is available for download here: http://www.grandstream.com Firmware Version 1.0.1.2 Grandstream Wave User Guide Page 8 of 64
Página 10 — gswave_user_manual-1
INSTALLATION AND SETUP
GETTING READY
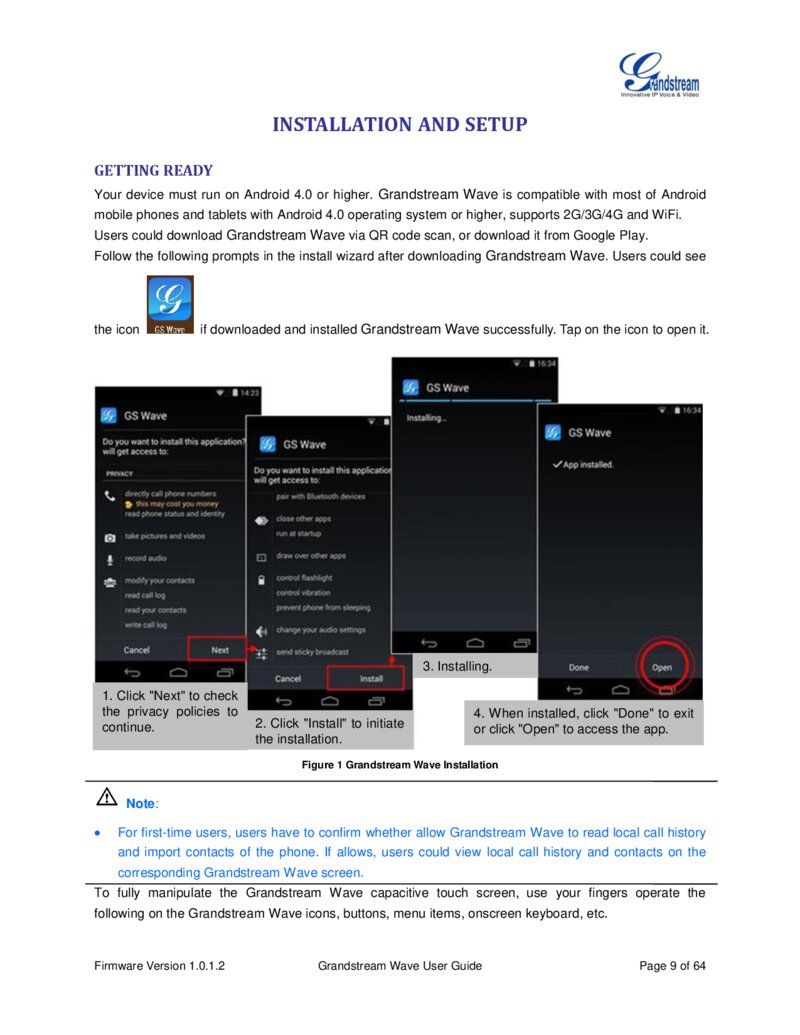
Your device must run on Android 4.0 or higher. Grandstream Wave is compatible with most of Android mobile phones and tablets with Android 4.0 operating system or higher, supports 2G/3G/4G and WiFi.
Users could download Grandstream Wave via QR code scan, or download it from Google Play.
Follow the following prompts in the install wizard after downloading Grandstream Wave. Users could see the icon if downloaded and installed Grandstream Wave successfully. Tap on the icon to open it.
3. Installing. 1. Click "Next" to check the privacy policies to continue.
2. Click "Install" to initiate the installation.
4. When installed, click "Done" to exit or click "Open" to access the app.
Figure 1 Grandstream Wave Installation Note:
For first-time users, users have to confirm whether allow Grandstream Wave to read local call history and import contacts of the phone. If allows, users could view local call history and contacts on the corresponding Grandstream Wave screen.
To fully manipulate the Grandstream Wave capacitive touch screen, use your fingers operate the following on the Grandstream Wave icons, buttons, menu items, onscreen keyboard, etc.
Firmware Version 1.0.1.2 Grandstream Wave User Guide Page 9 of 64
Página 11 — gswave_user_manual-1
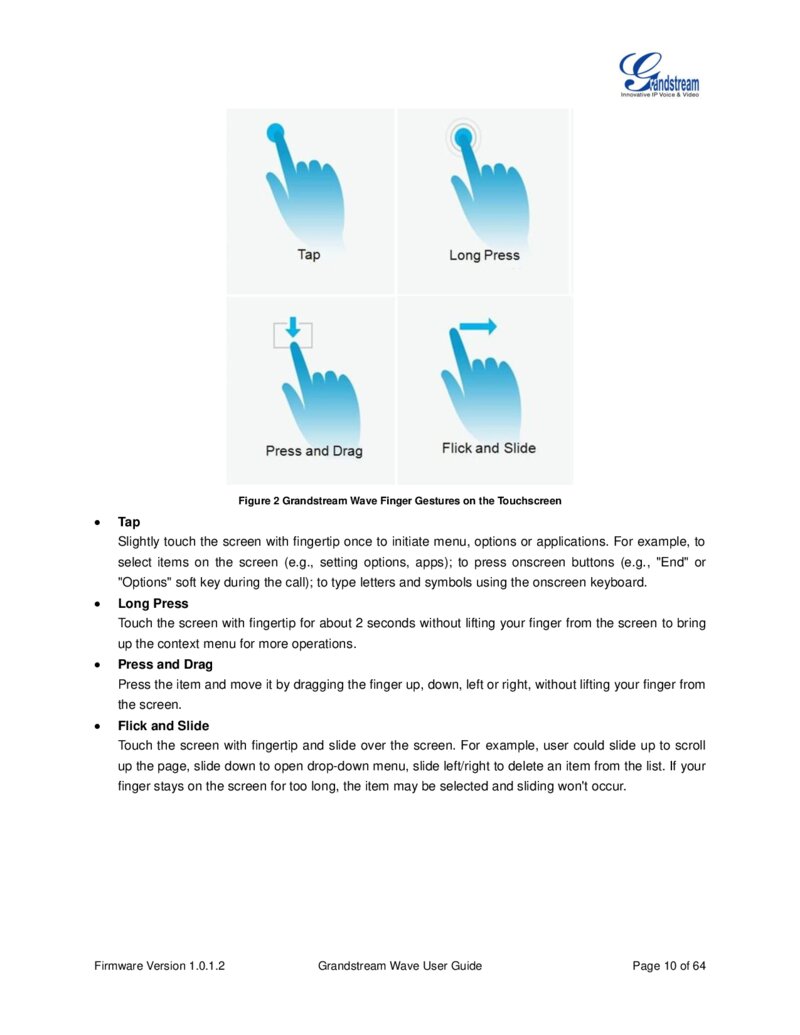
Figure 2 Grandstream Wave Finger Gestures on the Touchscreen Tap Slightly touch the screen with fingertip once to initiate menu, options or applications. For example, to select items on the screen (e.g., setting options, apps); to press onscreen buttons (e.g., "End" or "Options" soft key during the call); to type letters and symbols using the onscreen keyboard.
Long Press Touch the screen with fingertip for about 2 seconds without lifting your finger from the screen to bring up the context menu for more operations.
Press and Drag Press the item and move it by dragging the finger up, down, left or right, without lifting your finger from the screen.
Flick and Slide Touch the screen with fingertip and slide over the screen. For example, user could slide up to scroll up the page, slide down to open drop-down menu, slide left/right to delete an item from the list. If your finger stays on the screen for too long, the item may be selected and sliding won't occur.
Firmware Version 1.0.1.2 Grandstream Wave User Guide Page 10 of 64
Página 12 — gswave_user_manual-1
USING GRANDSTREAM WAVE
DIAL SCREEN
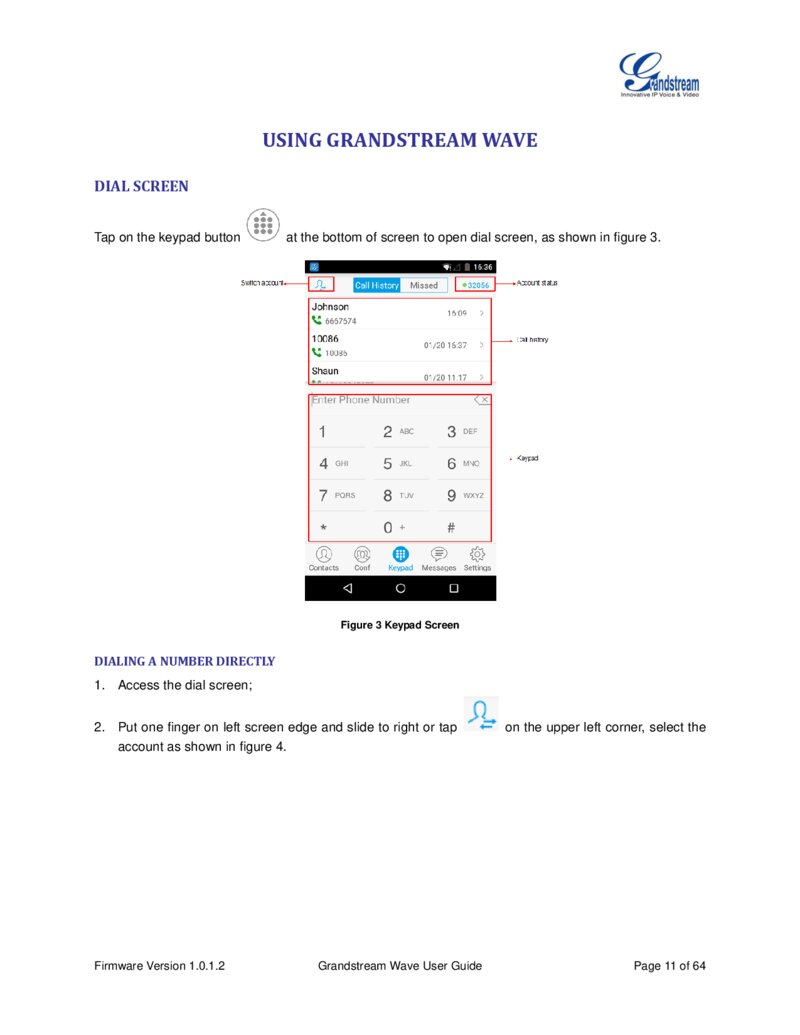
Tap on the keypad button at the bottom of screen to open dial screen, as shown in figure 3.
Figure 3 Keypad Screen
DIALING A NUMBER DIRECTLY
1. Access the dial screen; 2. Put one finger on left screen edge and slide to right or tap account as shown in figure 4.
Firmware Version 1.0.1.2 Grandstream Wave User Guide on the upper left corner, select the Page 11 of 64
Página 13 — gswave_user_manual-1
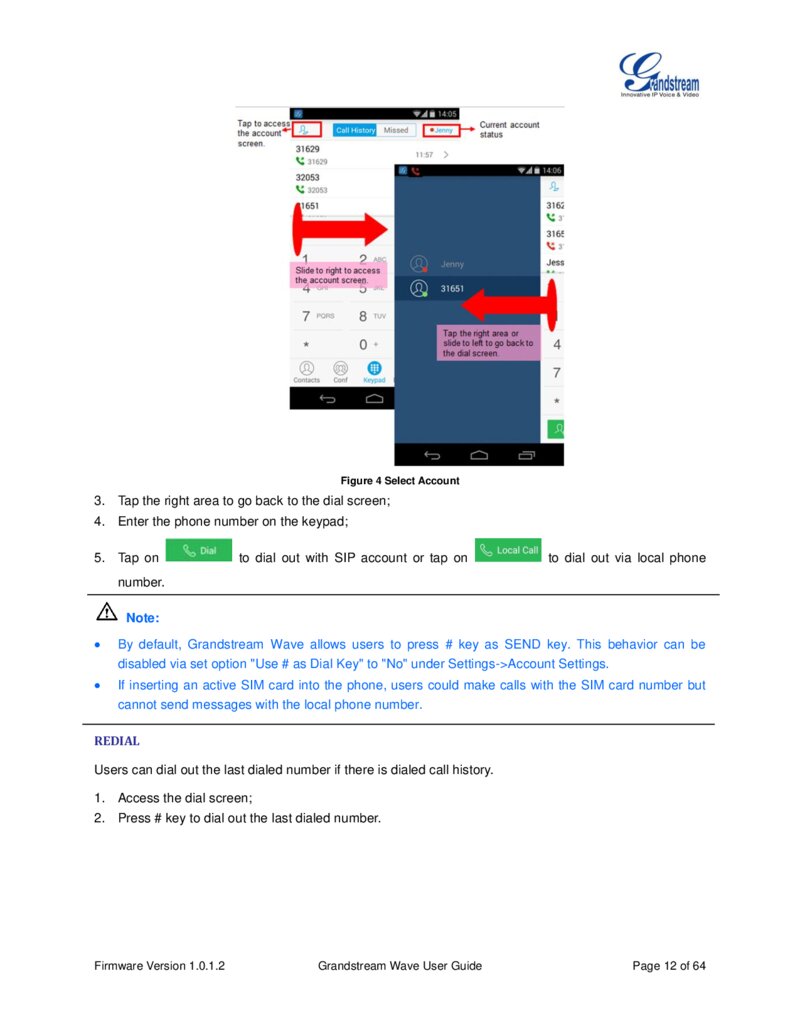
Figure 4 Select Account 3. Tap the right area to go back to the dial screen; 4. Enter the phone number on the keypad; 5. Tap on to dial out with SIP account or tap on to dial out via local phone number.
Note: By default, Grandstream Wave allows users to press # key as SEND key. This behavior can be disabled via set option "Use # as Dial Key" to "No" under Settings->Account Settings.
If inserting an active SIM card into the phone, users could make calls with the SIM card number but cannot send messages with the local phone number.
REDIAL
Users can dial out the last dialed number if there is dialed call history.
1. Access the dial screen; 2. Press # key to dial out the last dialed number.
Firmware Version 1.0.1.2 Grandstream Wave User Guide Page 12 of 64
Página 14 — gswave_user_manual-1
DIALING A NUMBER VIA CALL HISTORY
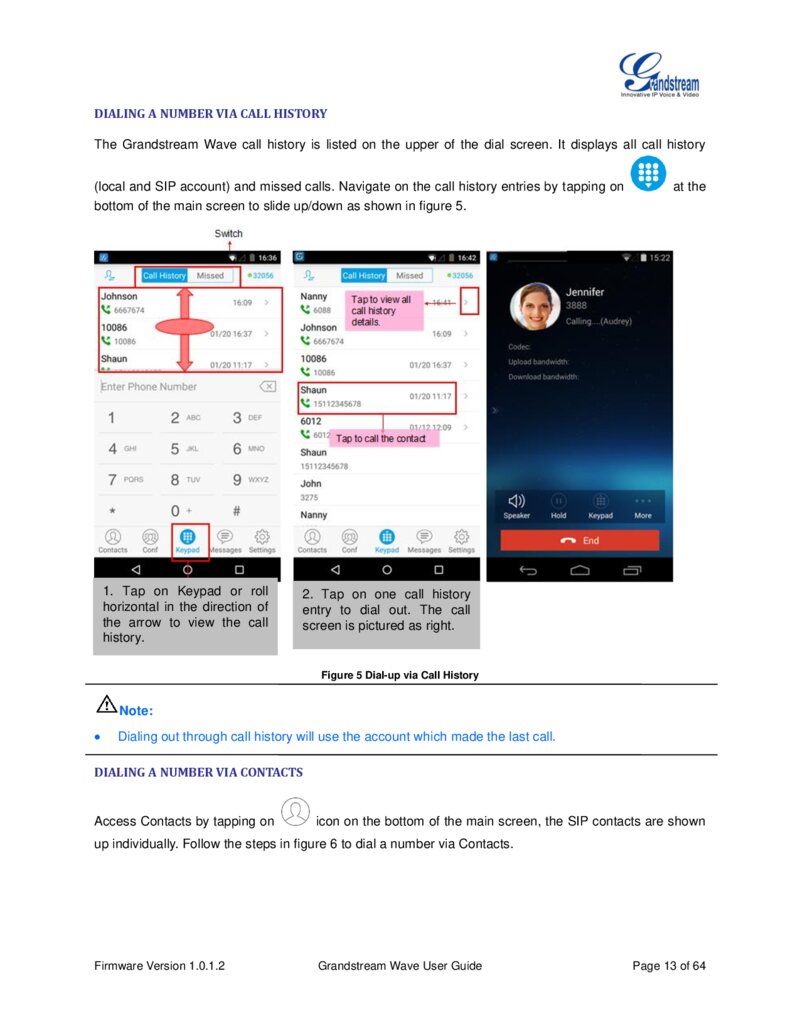
The Grandstream Wave call history is listed on the upper of the dial screen. It displays all call history (local and SIP account) and missed calls. Navigate on the call history entries by tapping on bottom of the main screen to slide up/down as shown in figure 5.
1. Tap on Keypad or roll horizontal in the direction of the arrow to view the call history.
at the 2. Tap on one call history entry to dial out. The call screen is pictured as right.
Figure 5 Dial-up via Call History Note: Dialing out through call history will use the account which made the last call.
DIALING A NUMBER VIA CONTACTS
Access Contacts by tapping on icon on the bottom of the main screen, the SIP contacts are shown up individually. Follow the steps in figure 6 to dial a number via Contacts.
Firmware Version 1.0.1.2 Grandstream Wave User Guide Page 13 of 64
Página 15 — gswave_user_manual-1
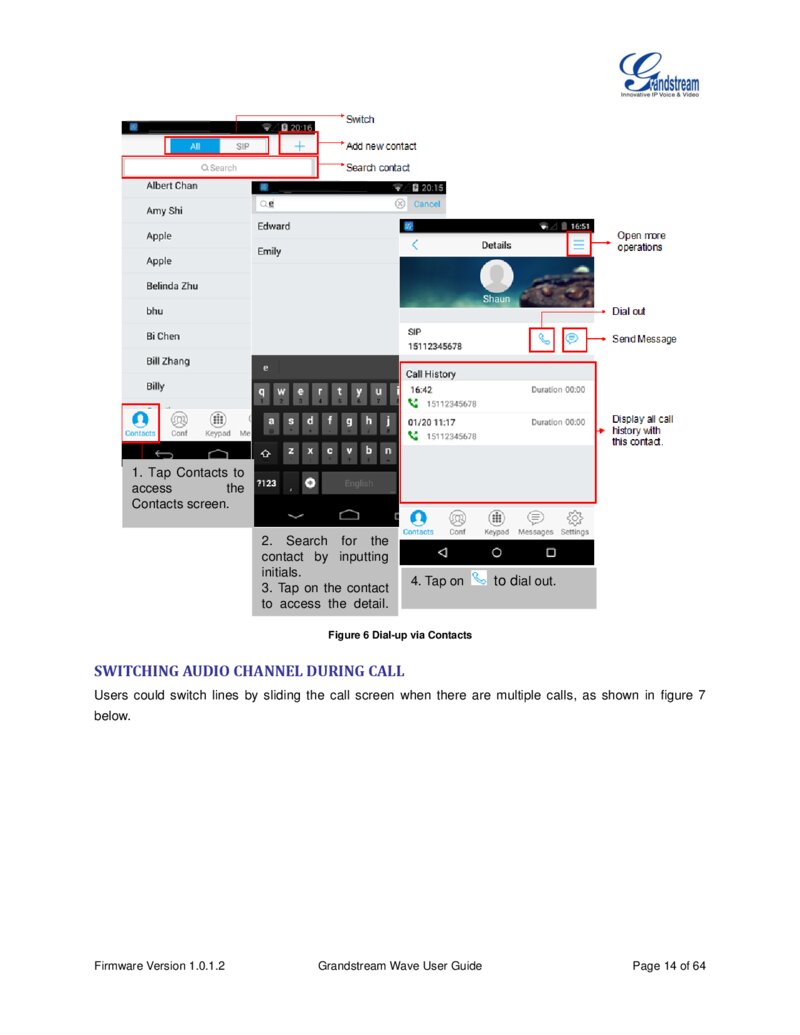
1. Tap Contacts to access the Contacts screen.
2. Search for the contact by inputting initials.
3. Tap on the contact to access the detail.
screen. 4. Tap on to dial out. Figure 6 Dial-up via Contacts
SWITCHING AUDIO CHANNEL DURING CALL
Users could switch lines by sliding the call screen when there are multiple calls, as shown in figure 7 below.
Firmware Version 1.0.1.2 Grandstream Wave User Guide Page 14 of 64
Página 16 — gswave_user_manual-1
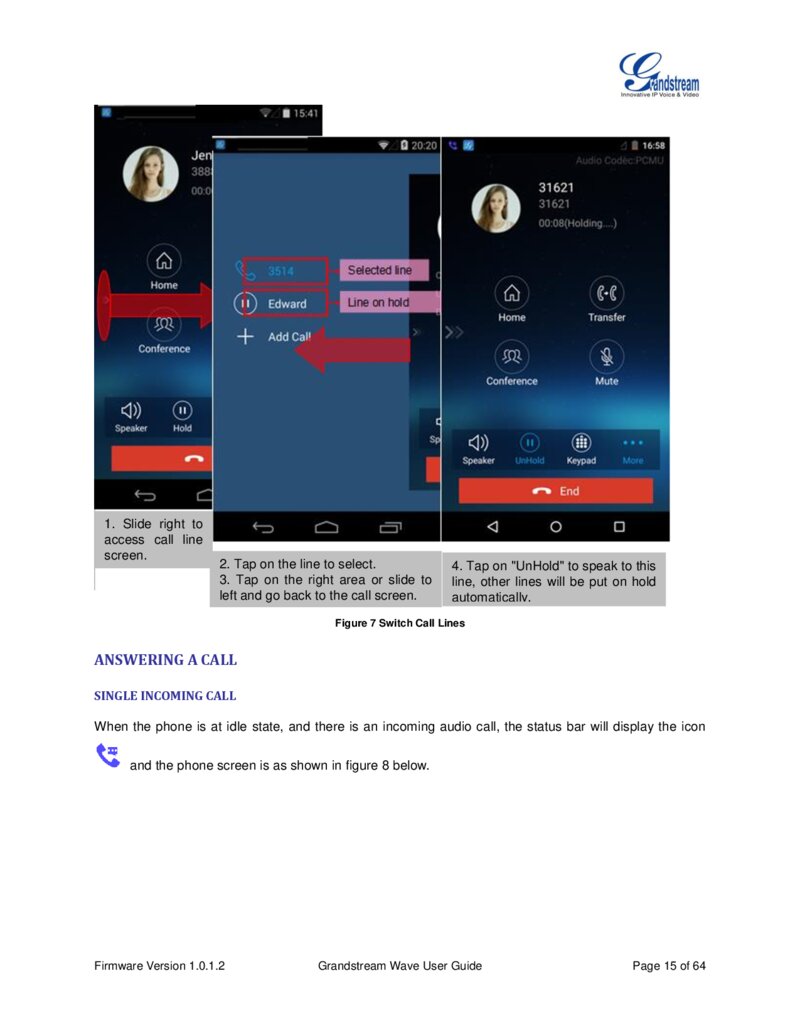
1. Slide right to access call line screen.
2. Tap on the line to select. 3. Tap on the right area or slide to left and go back to the call screen.
4. Tap on "UnHold" to speak to this line, other lines will be put on hold automatically.
Figure 7 Switch Call Lines
ANSWERING A CALL
SINGLE INCOMING CALL
When the phone is at idle state, and there is an incoming audio call, the status bar will display the icon and the phone screen is as shown in figure 8 below.
Firmware Version 1.0.1.2 Grandstream Wave User Guide Page 15 of 64
Página 17 — gswave_user_manual-1
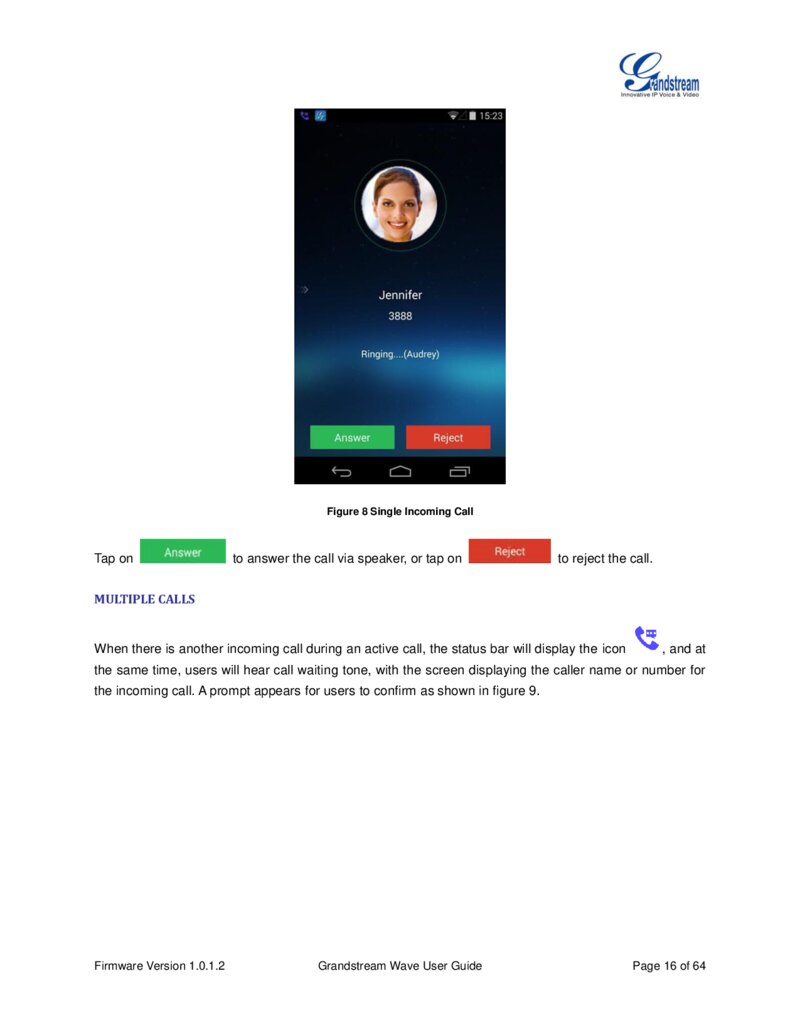
Figure 8 Single Incoming Call Tap on to answer the call via speaker, or tap on to reject the call.
MULTIPLE CALLS
When there is another incoming call during an active call, the status bar will display the icon , and at the same time, users will hear call waiting tone, with the screen displaying the caller name or number for the incoming call. A prompt appears for users to confirm as shown in figure 9.
Firmware Version 1.0.1.2 Grandstream Wave User Guide Page 16 of 64
Página 18 — gswave_user_manual-1
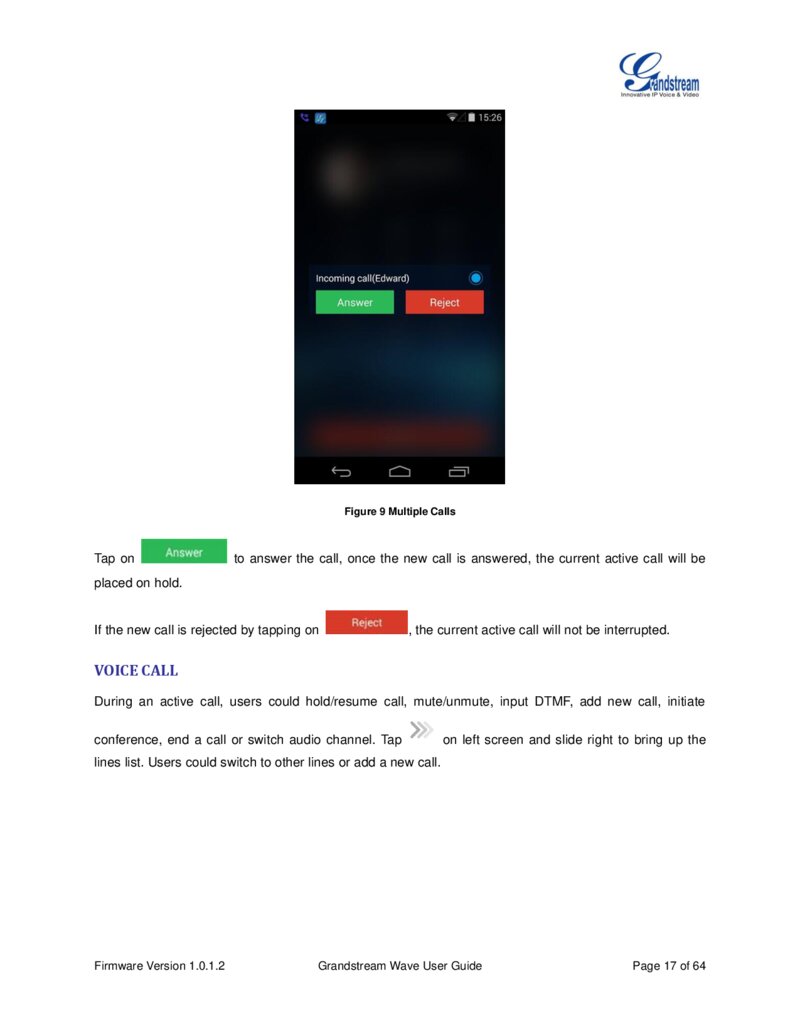
Figure 9 Multiple Calls Tap on to answer the call, once the new call is answered, the current active call will be placed on hold.
If the new call is rejected by tapping on , the current active call will not be interrupted.
VOICE CALL
During an active call, users could hold/resume call, mute/unmute, input DTMF, add new call, initiate conference, end a call or switch audio channel. Tap on left screen and slide right to bring up the lines list. Users could switch to other lines or add a new call.
Firmware Version 1.0.1.2 Grandstream Wave User Guide Page 17 of 64
Página 19 — gswave_user_manual-1
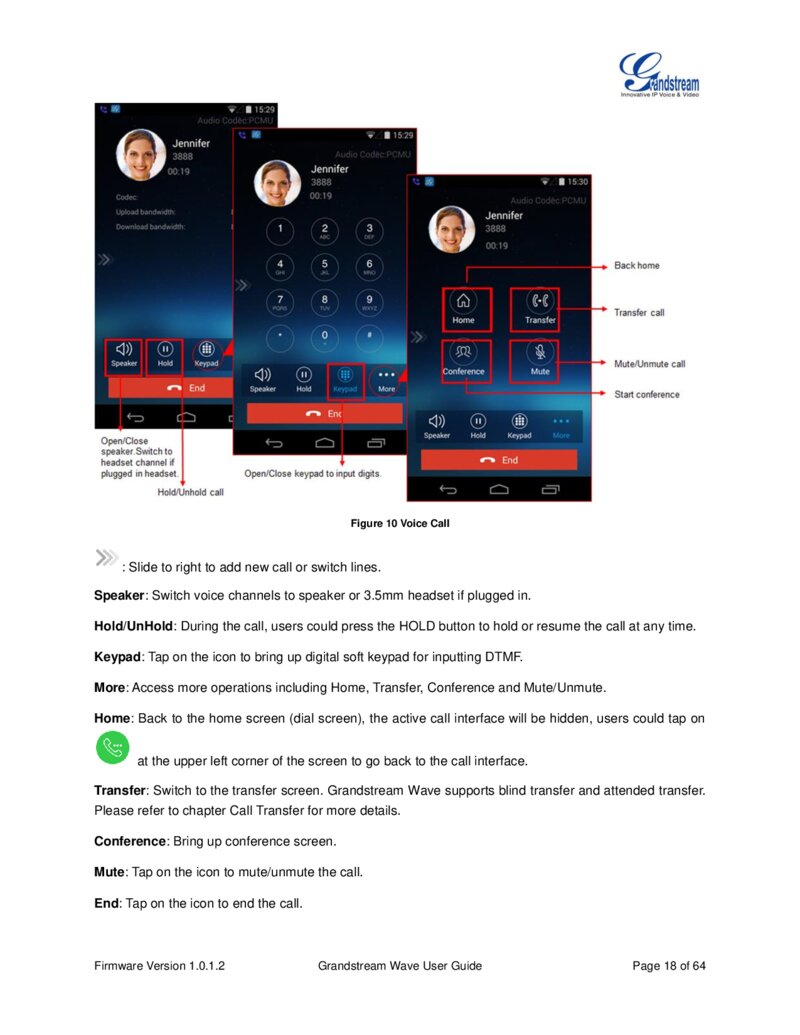
Figure 10 Voice Call : Slide to right to add new call or switch lines.
Speaker: Switch voice channels to speaker or 3.5mm headset if plugged in.
Hold/UnHold: During the call, users could press the HOLD button to hold or resume the call at any time.
Keypad: Tap on the icon to bring up digital soft keypad for inputting DTMF.
More: Access more operations including Home, Transfer, Conference and Mute/Unmute.
Home: Back to the home screen (dial screen), the active call interface will be hidden, users could tap on at the upper left corner of the screen to go back to the call interface.
Transfer: Switch to the transfer screen. Grandstream Wave supports blind transfer and attended transfer.
Please refer to chapter Call Transfer for more details.
Conference: Bring up conference screen. Mute: Tap on the icon to mute/unmute the call.
End: Tap on the icon to end the call. Firmware Version 1.0.1.2 Grandstream Wave User Guide Page 18 of 64
Página 20 — gswave_user_manual-1
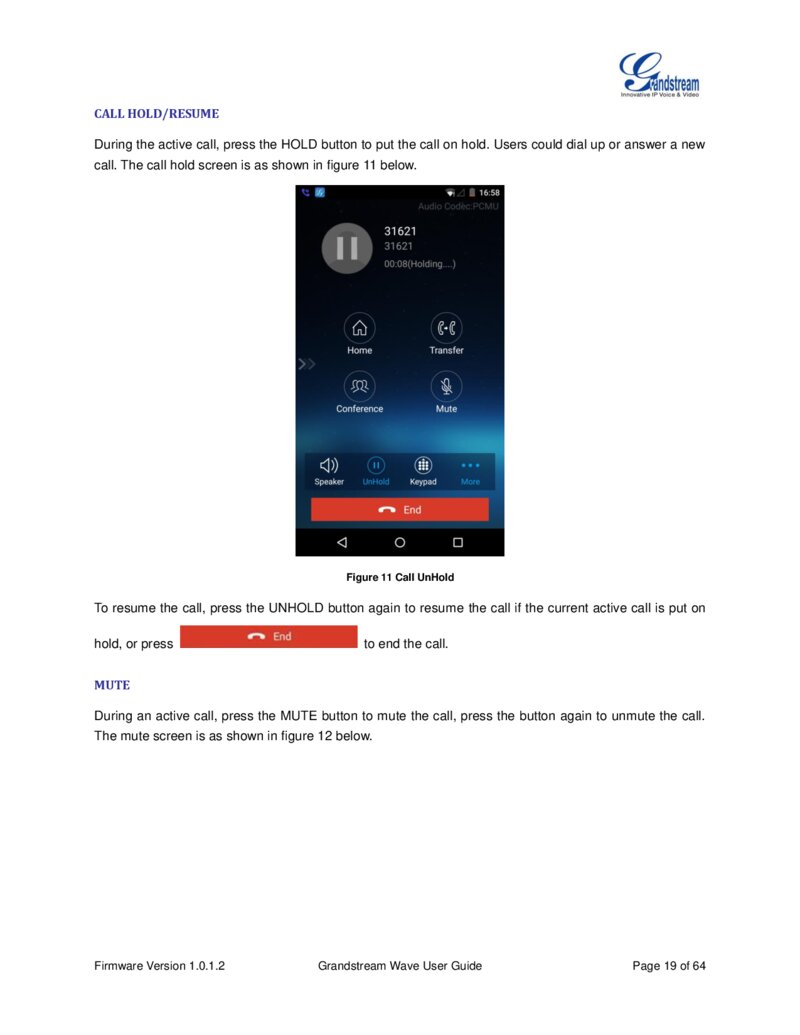
CALL HOLD/RESUME
During the active call, press the HOLD button to put the call on hold. Users could dial up or answer a new call. The call hold screen is as shown in figure 11 below.
Figure 11 Call UnHold To resume the call, press the UNHOLD button again to resume the call if the current active call is put on hold, or press to end the call.
MUTE
During an active call, press the MUTE button to mute the call, press the button again to unmute the call.
The mute screen is as shown in figure 12 below.
Firmware Version 1.0.1.2 Grandstream Wave User Guide Page 19 of 64
Página 21 — gswave_user_manual-1
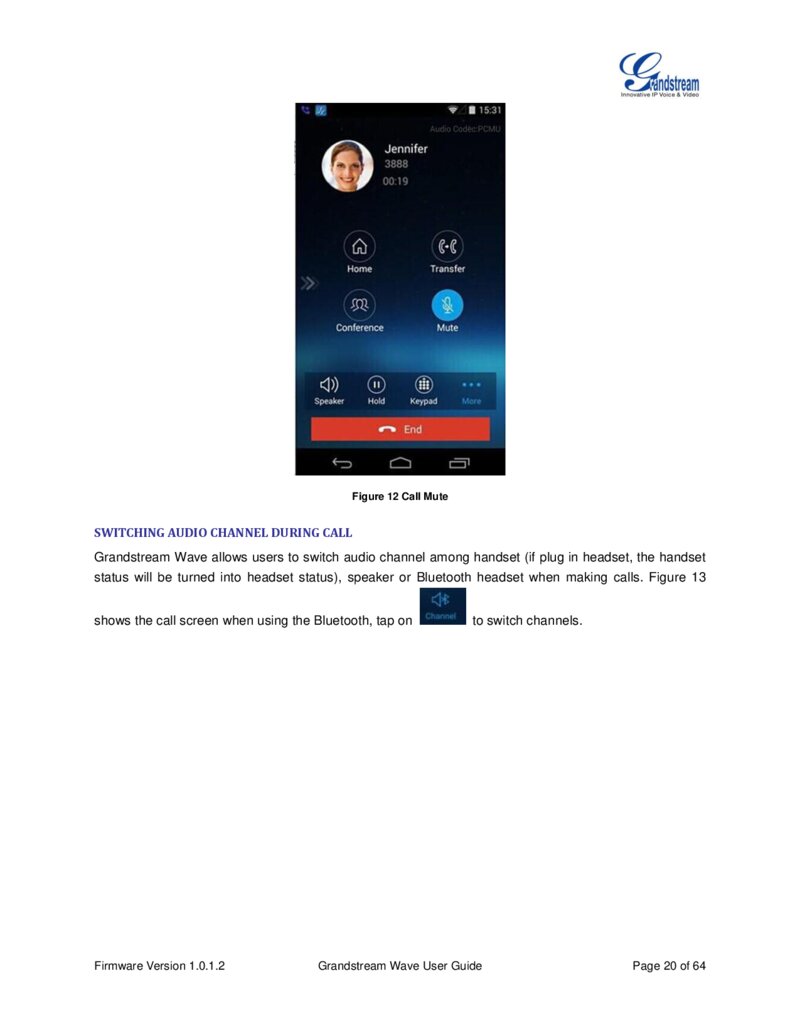
Figure 12 Call Mute
SWITCHING AUDIO CHANNEL DURING CALL
Grandstream Wave allows users to switch audio channel among handset (if plug in headset, the handset status will be turned into headset status), speaker or Bluetooth headset when making calls. Figure 13 shows the call screen when using the Bluetooth, tap on Firmware Version 1.0.1.2 to switch channels.
Grandstream Wave User Guide Page 20 of 64
Página 22 — gswave_user_manual-1
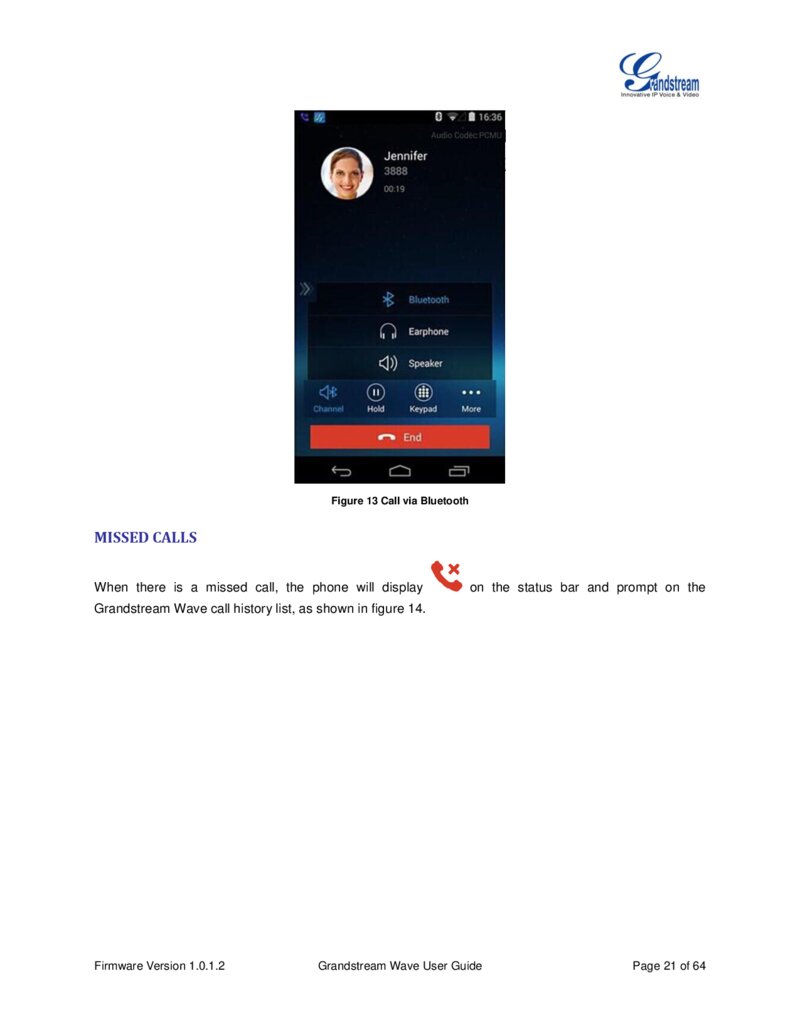
Figure 13 Call via Bluetooth
MISSED CALLS
When there is a missed call, the phone will display on the status bar and prompt on the Grandstream Wave call history list, as shown in figure 14.
Firmware Version 1.0.1.2 Grandstream Wave User Guide Page 21 of 64
Página 23 — gswave_user_manual-1
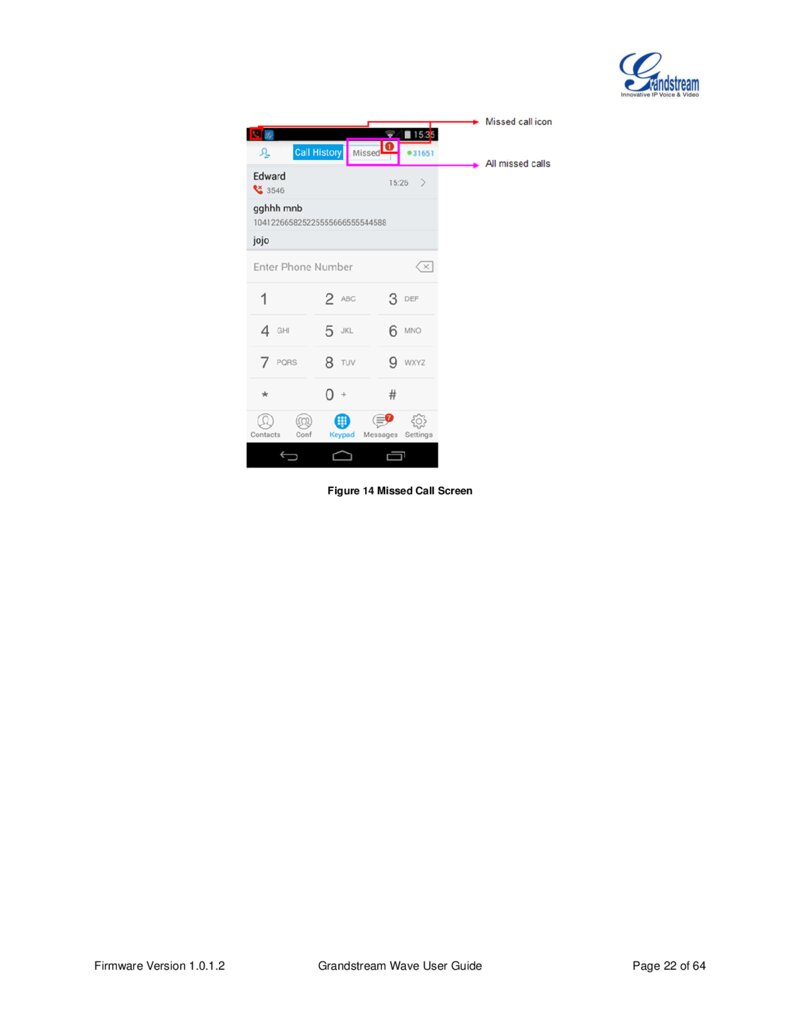
Figure 14 Missed Call Screen Firmware Version 1.0.1.2 Grandstream Wave User Guide Page 22 of 64
Página 24 — gswave_user_manual-1
CALL TRANSFER
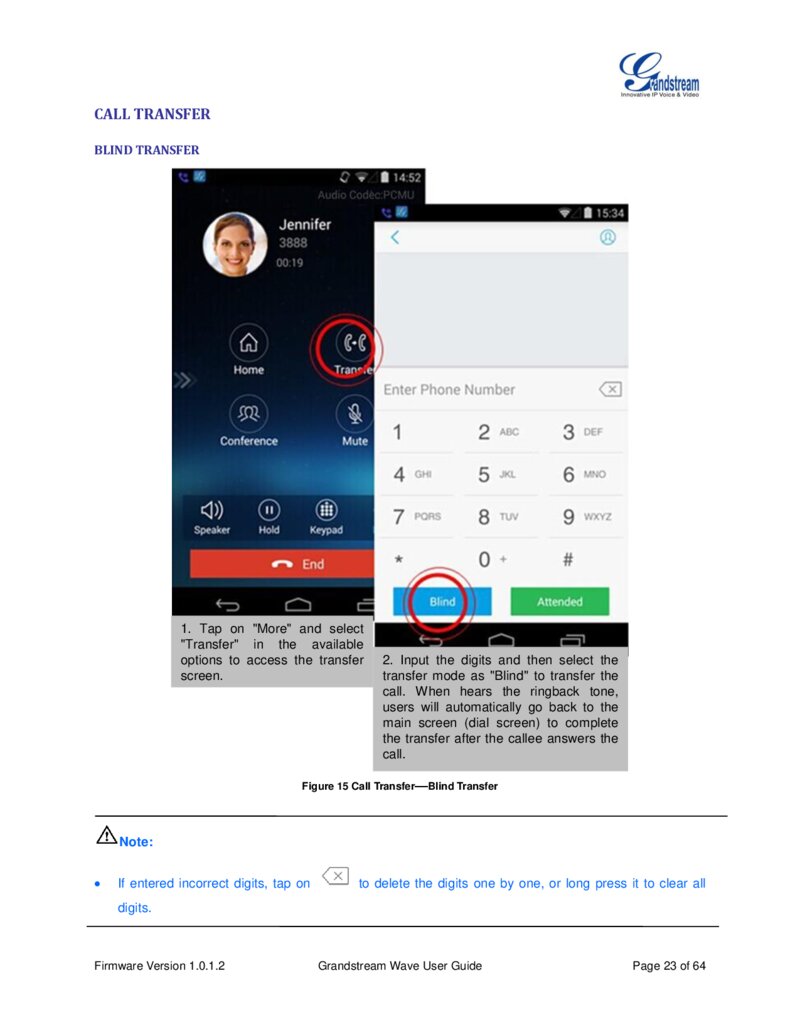
BLIND TRANSFER
1. Tap on "More" and select "Transfer" in the available options to access the transfer screen.
2. Input the digits and then select the transfer mode as "Blind" to transfer the call. When hears the ringback tone, users will automatically go back to the main screen (dial screen) to complete the transfer after the callee answers the call.
Figure 15 Call Transfer—Blind Transfer Note:
If entered incorrect digits, tap on to delete the digits one by one, or long press it to clear all digits.
Firmware Version 1.0.1.2 Grandstream Wave User Guide Page 23 of 64
Página 25 — gswave_user_manual-1
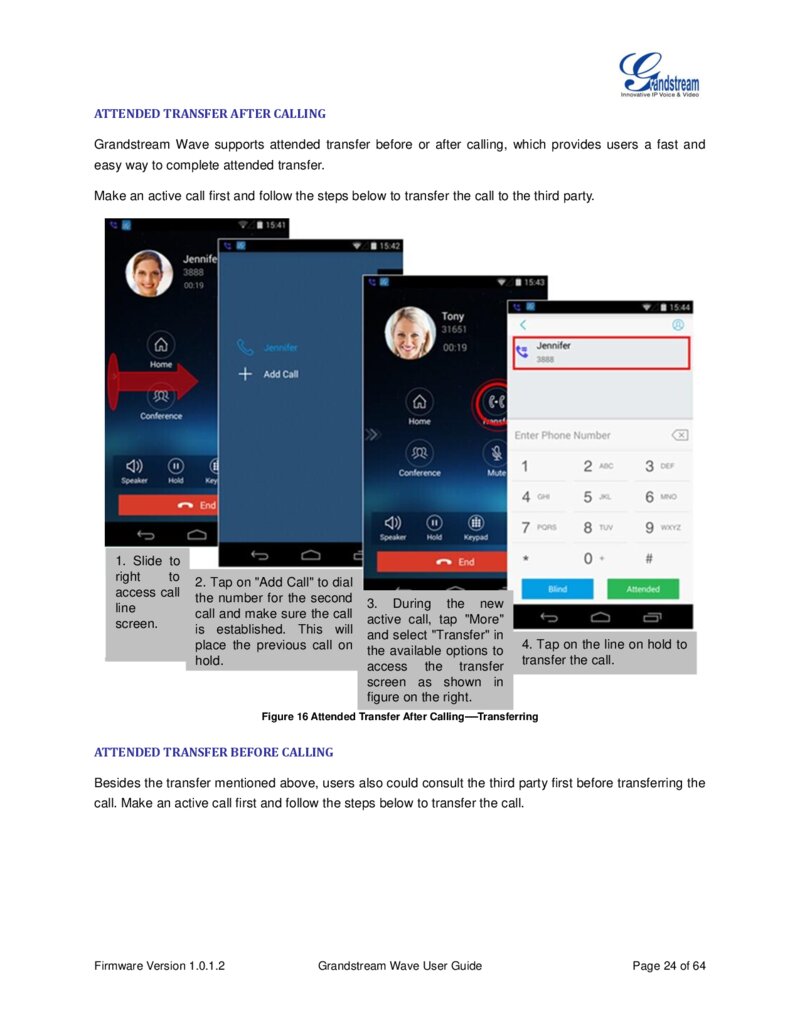
ATTENDED TRANSFER AFTER CALLING
Grandstream Wave supports attended transfer before or after calling, which provides users a fast and easy way to complete attended transfer.
Make an active call first and follow the steps below to transfer the call to the third party.
1. Slide to right to access call line screen.
2. Tap on "Add Call" to dial the number for the second call and make sure the call is established. This will place the previous call on hold.
3. During the new active call, tap "More" and select "Transfer" in the available options to 4. Tap on the line on hold to access the transfer transfer the call.
screen as shown in figure on the right. Figure 16 Attended Transfer After Calling—Transferring
ATTENDED TRANSFER BEFORE CALLING
Besides the transfer mentioned above, users also could consult the third party first before transferring the call. Make an active call first and follow the steps below to transfer the call.
Firmware Version 1.0.1.2 Grandstream Wave User Guide Page 24 of 64
Página 26 — gswave_user_manual-1
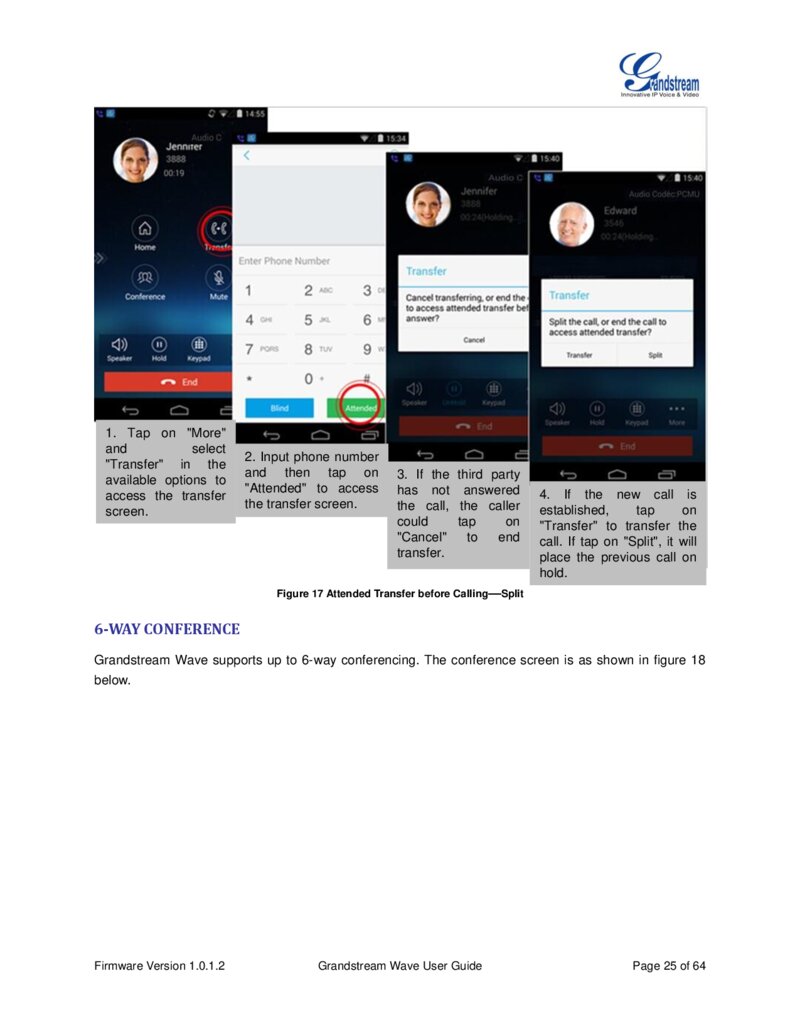
1. Tap on "More" and select "Transfer" in the available options to access the transfer screen.
2. Input phone number and then tap on "Attended" to access the transfer screen.
3. If the third party has not answered the call, the caller could tap on "Cancel" to end transfer.
4. If the new call is established, tap on "Transfer" to transfer the call. If tap on "Split", it will place the previous call on hold.
Figure 17 Attended Transfer before Calling—Split
6-WAY CONFERENCE
Grandstream Wave supports up to 6-way conferencing. The conference screen is as shown in figure 18 below.
Firmware Version 1.0.1.2 Grandstream Wave User Guide Page 25 of 64
Página 27 — gswave_user_manual-1
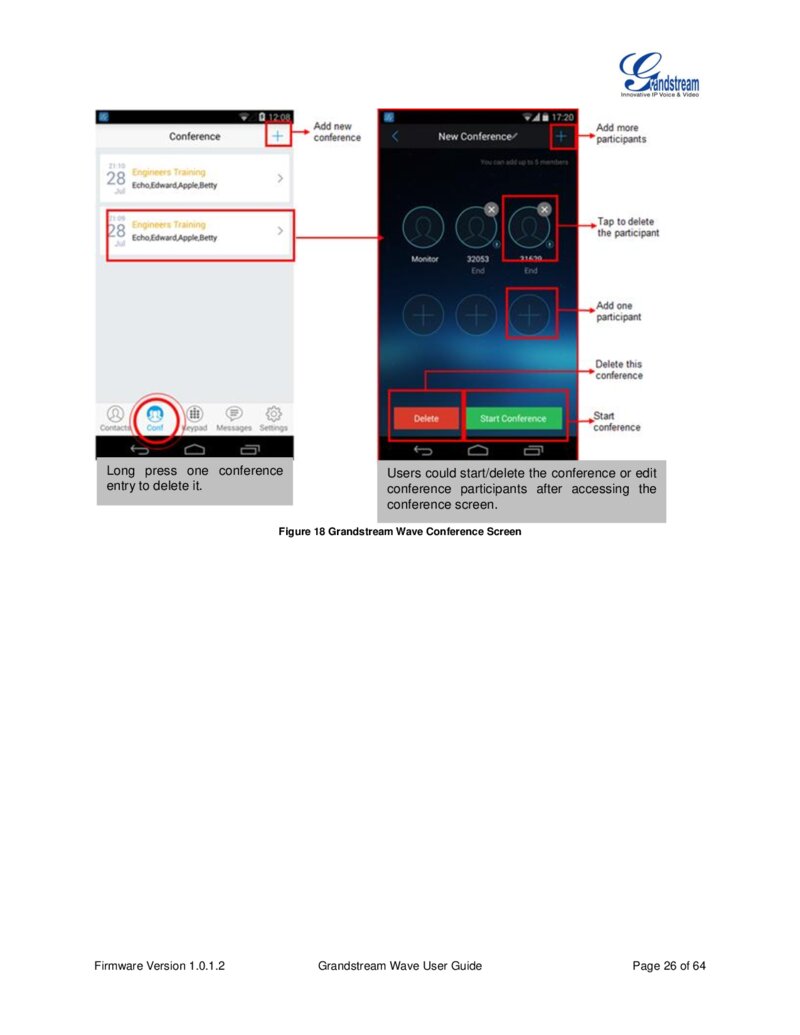
Long press one conference entry to delete it.
Users could start/delete the conference or edit conference participants after accessing the conference screen.
Figure 18 Grandstream Wave Conference Screen Firmware Version 1.0.1.2 Grandstream Wave User Guide Page 26 of 64
Página 28 — gswave_user_manual-1
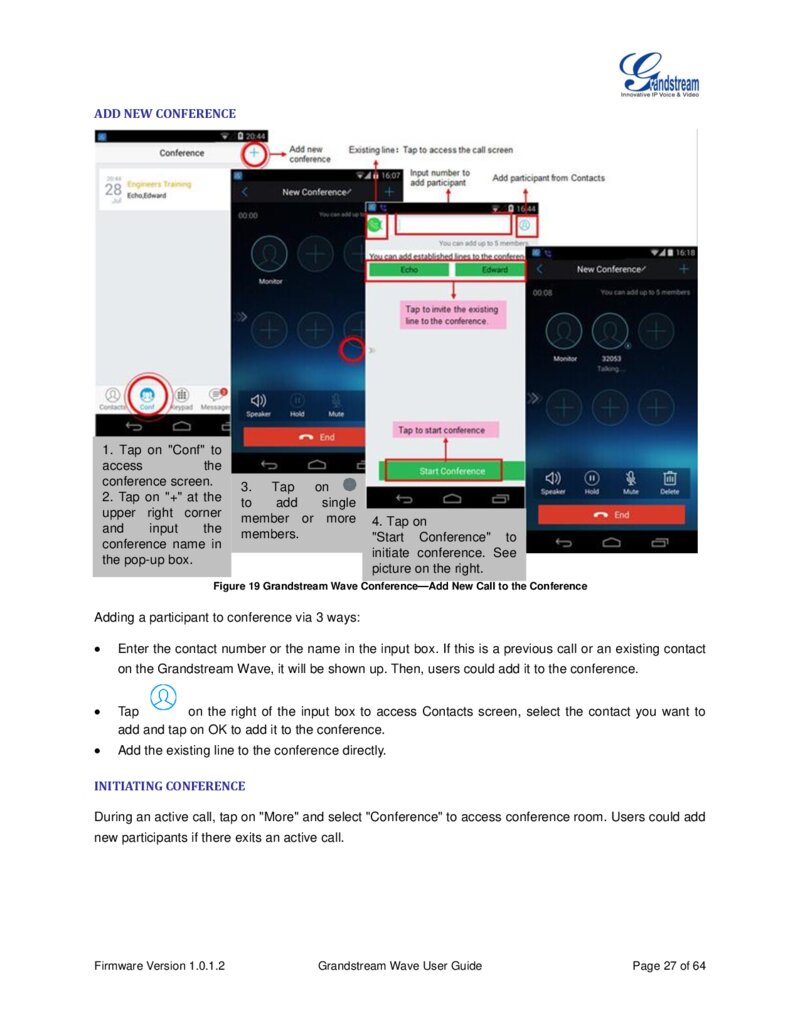
ADD NEW CONFERENCE
1. Tap on "Conf" to access the conference screen.
2. Tap on "+" at the upper right corner and input the conference name in the pop-up box.
3. Tap on to add single member or more members.
4. Tap on "Start Conference" to initiate conference. See picture on the right.
Figure 19 Grandstream Wave Conference—Add New Call to the Conference Adding a participant to conference via 3 ways:
Enter the contact number or the name in the input box. If this is a previous call or an existing contact on the Grandstream Wave, it will be shown up. Then, users could add it to the conference.
Tap on the right of the input box to access Contacts screen, select the contact you want to add and tap on OK to add it to the conference.
Add the existing line to the conference directly.
INITIATING CONFERENCE
During an active call, tap on "More" and select "Conference" to access conference room. Users could add new participants if there exits an active call.
Firmware Version 1.0.1.2 Grandstream Wave User Guide Page 27 of 64
Página 29 — gswave_user_manual-1

1. Tap on "More" and select "Conference" to access the conference screen.
2. Tap on any on the screen to add single participant or tap on at the upper right corner to add multiple participants.
3. Tap on "Add" to add participant to the conference.
4. Repeat the above steps to add more participants in.
Figure 20 Grandstream Wave Conference—Initiating Conference While all participants have been in the conference, users could tap on the buttons below to make the corresponding operations.
Speaker: Enables the speaker for the conference.
Hold: Hold the conference. Mute: Mute the conference participant individually.
Delete: Delete the conference participant.
Firmware Version 1.0.1.2 Grandstream Wave User Guide Page 28 of 64
Página 30 — gswave_user_manual-1
When the conference participant is disconnected or the call with the participant is over, tap top right corner of the participant to redial.
on the
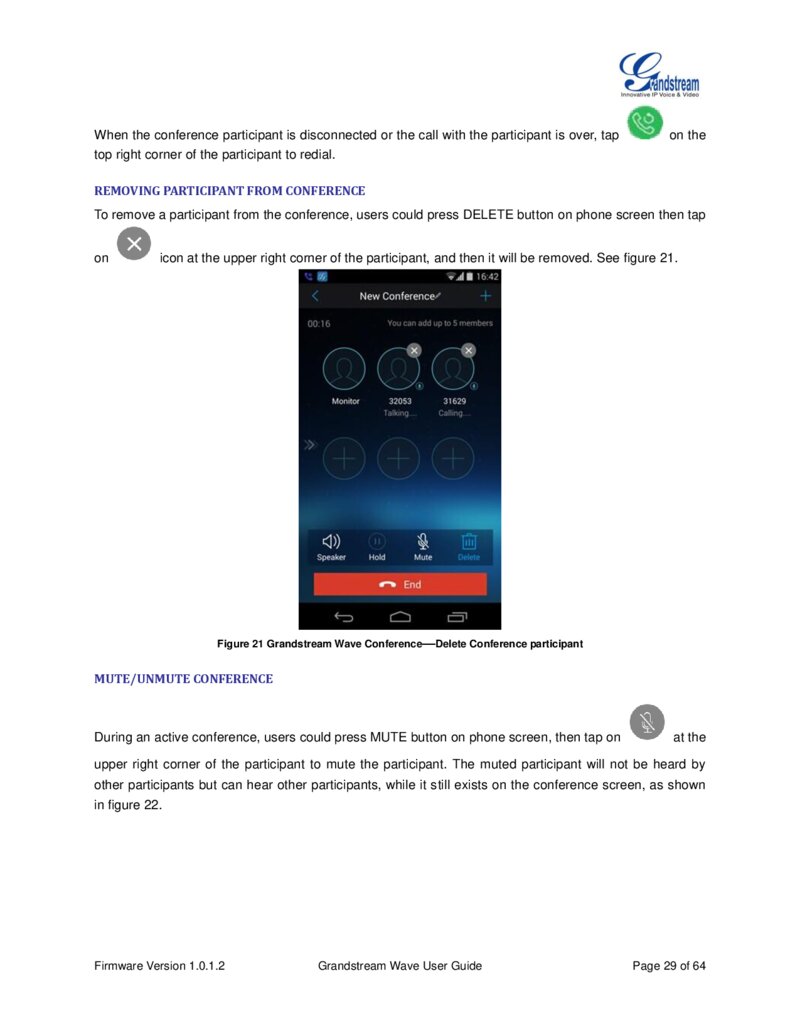
REMOVING PARTICIPANT FROM CONFERENCE
To remove a participant from the conference, users could press DELETE button on phone screen then tap on icon at the upper right corner of the participant, and then it will be removed. See figure 21.
Figure 21 Grandstream Wave Conference—Delete Conference participant
MUTE/UNMUTE CONFERENCE
During an active conference, users could press MUTE button on phone screen, then tap on at the upper right corner of the participant to mute the participant. The muted participant will not be heard by other participants but can hear other participants, while it still exists on the conference screen, as shown in figure 22.
Firmware Version 1.0.1.2 Grandstream Wave User Guide Page 29 of 64
Página 31 — gswave_user_manual-1
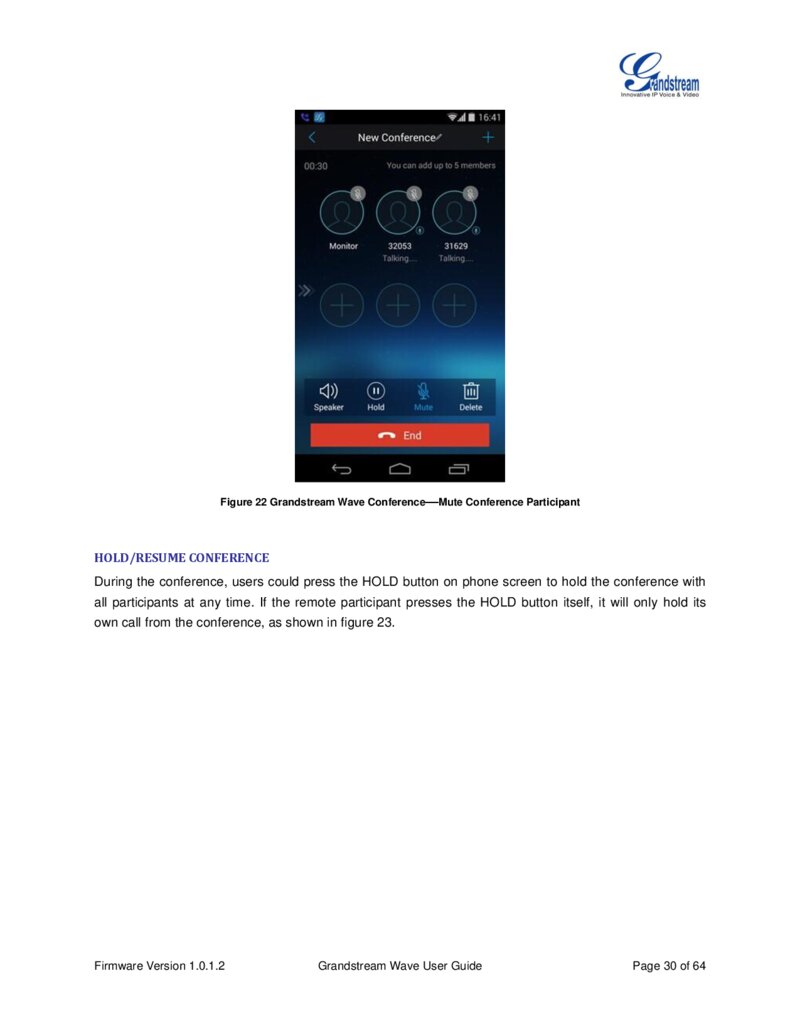
Figure 22 Grandstream Wave Conference—Mute Conference Participant
HOLD/RESUME CONFERENCE
During the conference, users could press the HOLD button on phone screen to hold the conference with all participants at any time. If the remote participant presses the HOLD button itself, it will only hold its own call from the conference, as shown in figure 23.
Firmware Version 1.0.1.2 Grandstream Wave User Guide Page 30 of 64
Página 32 — gswave_user_manual-1
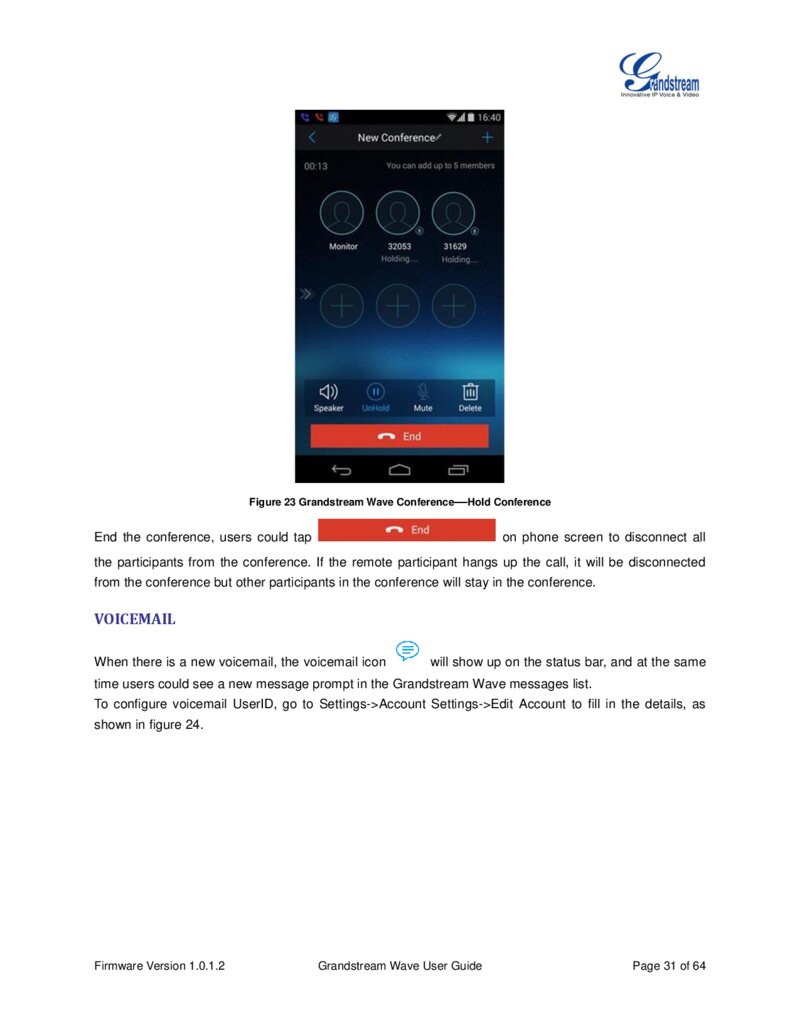
Figure 23 Grandstream Wave Conference—Hold Conference End the conference, users could tap on phone screen to disconnect all the participants from the conference. If the remote participant hangs up the call, it will be disconnected from the conference but other participants in the conference will stay in the conference.
VOICEMAIL
When there is a new voicemail, the voicemail icon will show up on the status bar, and at the same time users could see a new message prompt in the Grandstream Wave messages list.
To configure voicemail UserID, go to Settings->Account Settings->Edit Account to fill in the details, as shown in figure 24.
Firmware Version 1.0.1.2 Grandstream Wave User Guide Page 31 of 64
Página 33 — gswave_user_manual-1
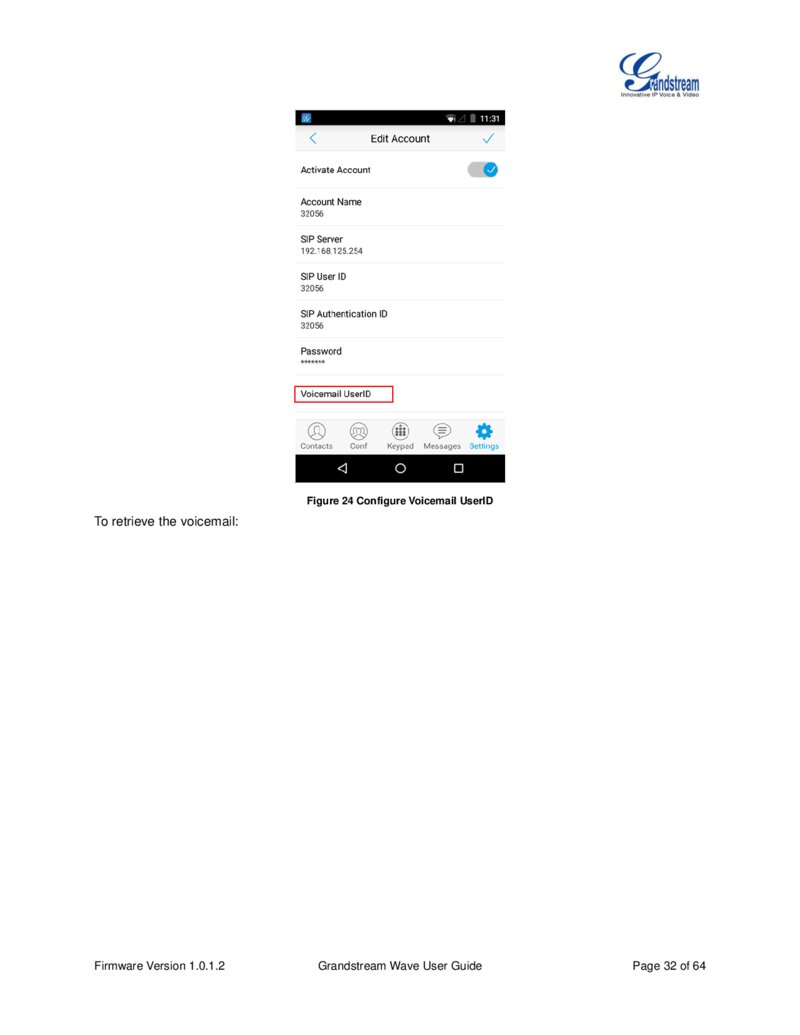
Figure 24 Configure Voicemail UserID To retrieve the voicemail:
Firmware Version 1.0.1.2 Grandstream Wave User Guide Page 32 of 64
Página 34 — gswave_user_manual-1

1. Tap "Messages" to access Messages screen.
2. Tap on "Voicemail" to access the detail screen.
3. Tap on "Listen" to dial out. 4. Listen to the voicemail by following the voice prompt.
Figure 25 Retrieve Voicemail Note: It require a password to listen to the voicemail, please contact the service provider to obtain the password.
CONTACTS
Users can manage their phone contacts and SIP contacts in Grandstream Wave Contacts. To access Grandstream Wave Contacts, tap on Firmware Version 1.0.1.2 at the bottom of the main screen, as shown in figure 26.
Grandstream Wave User Guide Page 33 of 64
Página 35 — gswave_user_manual-1
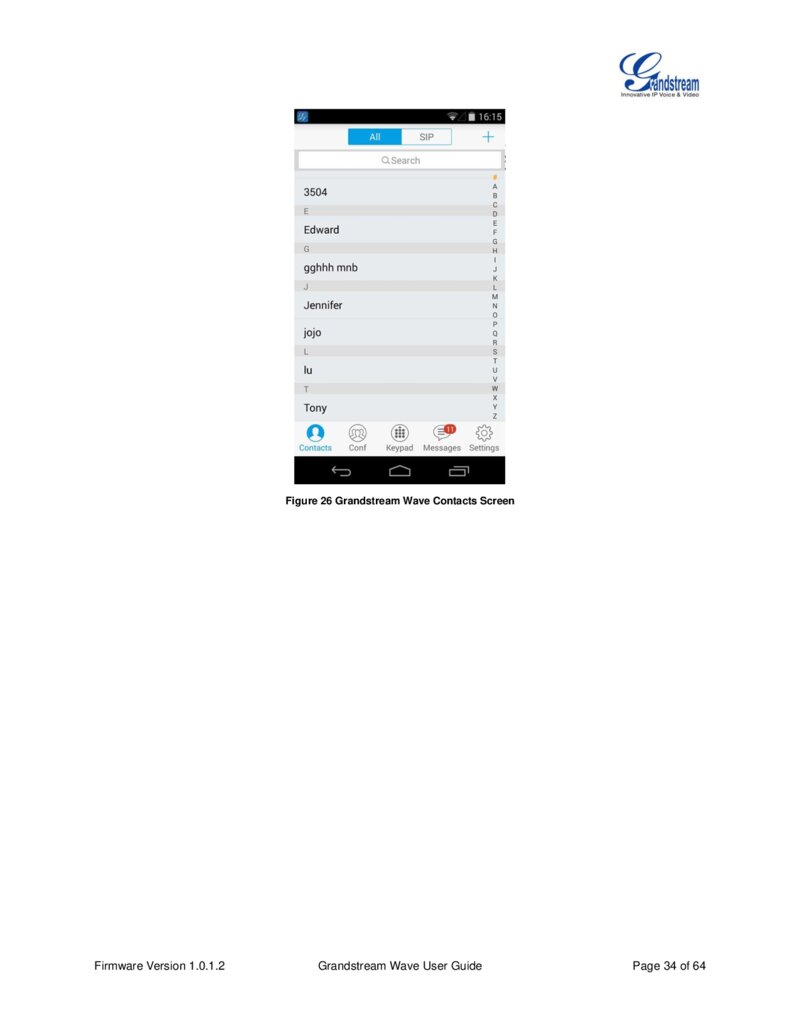
Figure 26 Grandstream Wave Contacts Screen Firmware Version 1.0.1.2 Grandstream Wave User Guide Page 34 of 64
Página 36 — gswave_user_manual-1
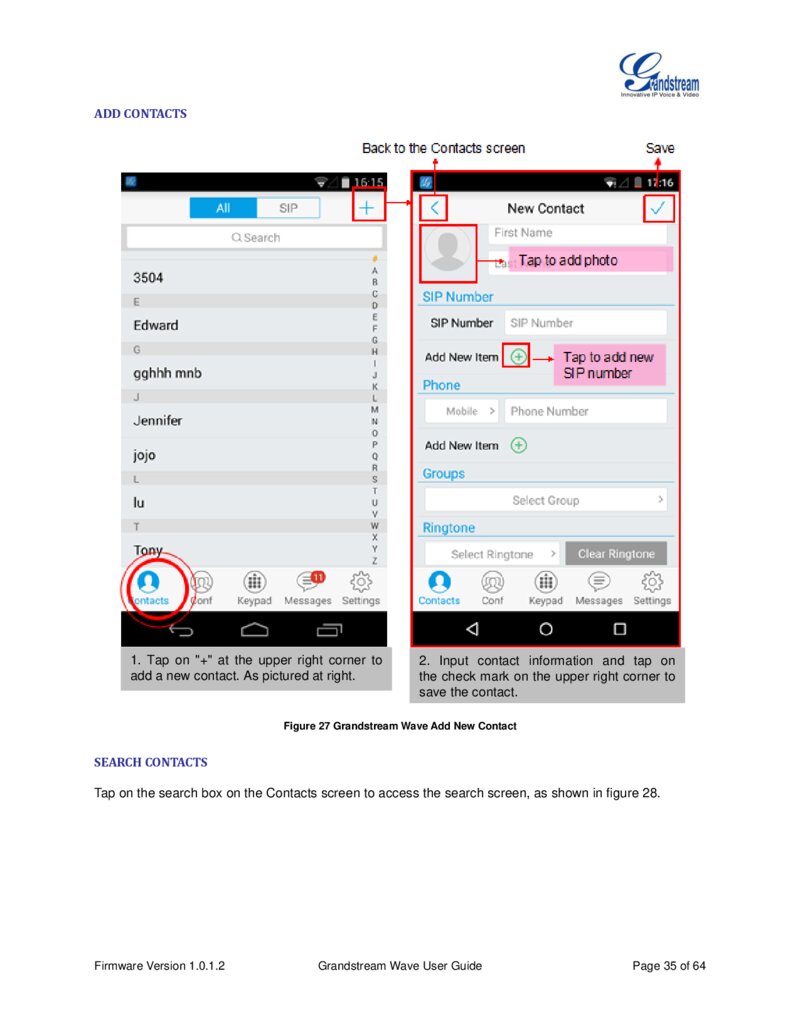
ADD CONTACTS
1. Tap on "+" at the upper right corner to add a new contact. As pictured at right.
2. Input contact information and tap on the check mark on the upper right corner to save the contact.
Figure 27 Grandstream Wave Add New Contact
SEARCH CONTACTS
Tap on the search box on the Contacts screen to access the search screen, as shown in figure 28.
Firmware Version 1.0.1.2 Grandstream Wave User Guide Page 35 of 64
Página 37 — gswave_user_manual-1
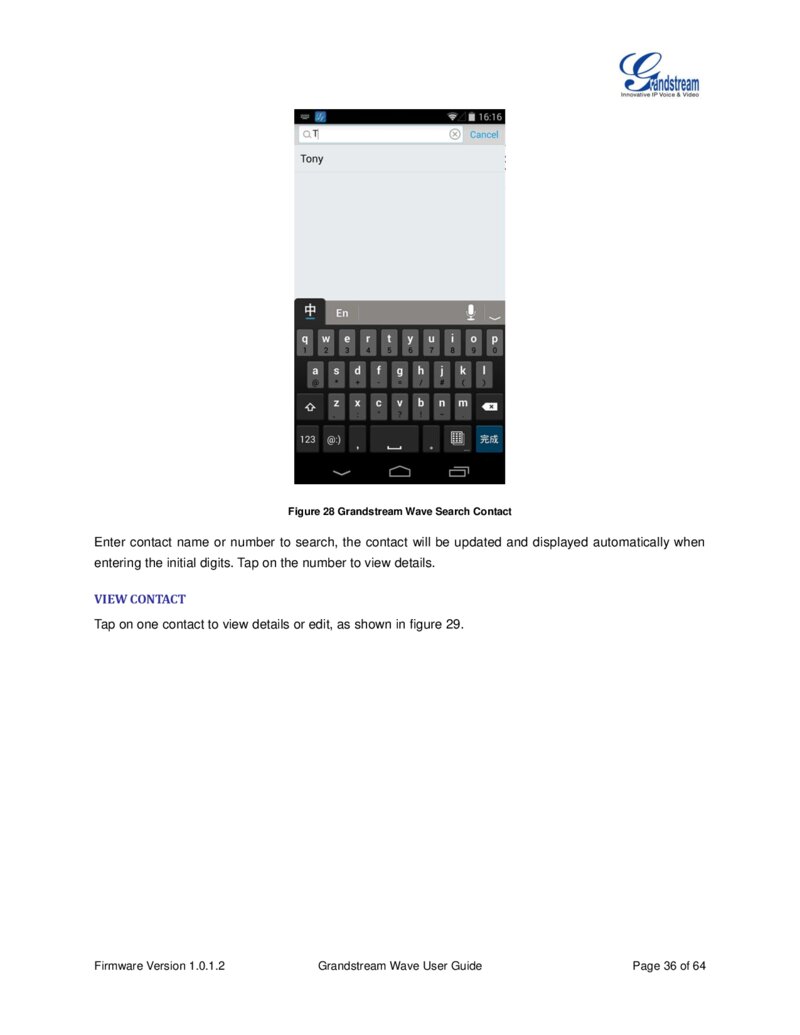
Figure 28 Grandstream Wave Search Contact Enter contact name or number to search, the contact will be updated and displayed automatically when entering the initial digits. Tap on the number to view details.
VIEW CONTACT
Tap on one contact to view details or edit, as shown in figure 29.
Firmware Version 1.0.1.2 Grandstream Wave User Guide Page 36 of 64
Página 38 — gswave_user_manual-1
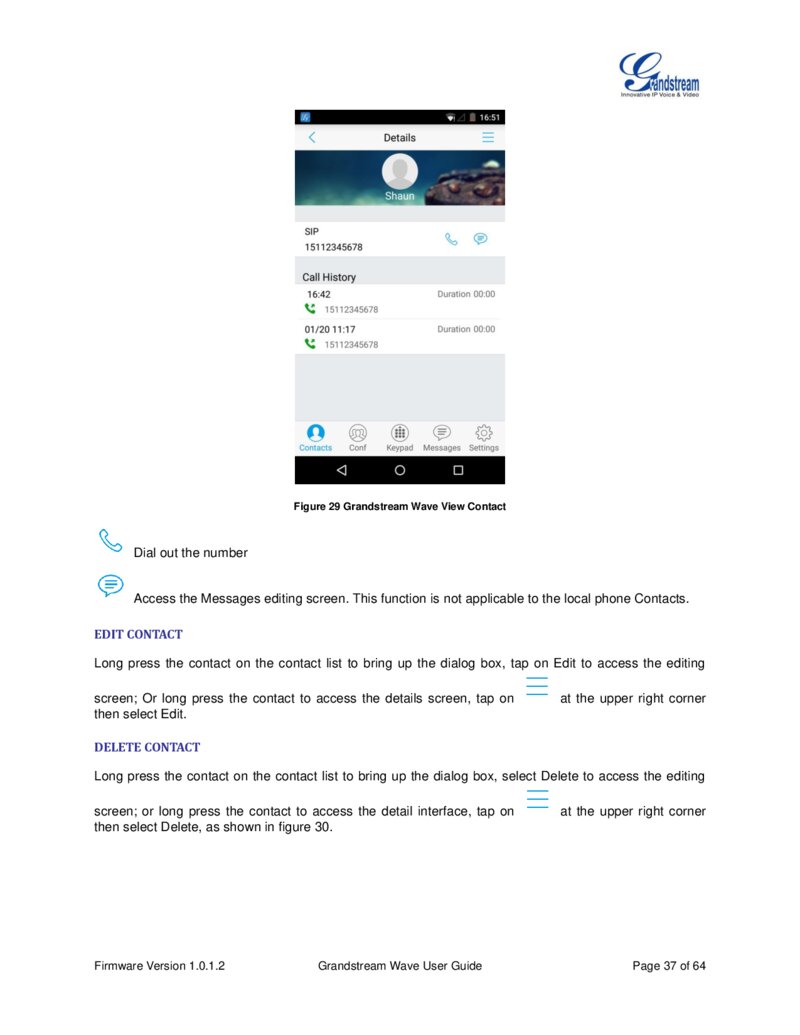
Figure 29 Grandstream Wave View Contact Dial out the number Access the Messages editing screen. This function is not applicable to the local phone Contacts.
EDIT CONTACT
Long press the contact on the contact list to bring up the dialog box, tap on Edit to access the editing screen; Or long press the contact to access the details screen, tap on then select Edit.
at the upper right corner
DELETE CONTACT
Long press the contact on the contact list to bring up the dialog box, select Delete to access the editing screen; or long press the contact to access the detail interface, tap on then select Delete, as shown in figure 30.
Firmware Version 1.0.1.2 Grandstream Wave User Guide at the upper right corner Page 37 of 64
Página 39 — gswave_user_manual-1

Figure 30 Grandstream Wave Edit Contact
ADD CONTACT TO FAVORITES
To add a contact to favorites, as shown in figure 31.
Firmware Version 1.0.1.2 Grandstream Wave User Guide Page 38 of 64
Página 40 — gswave_user_manual-1
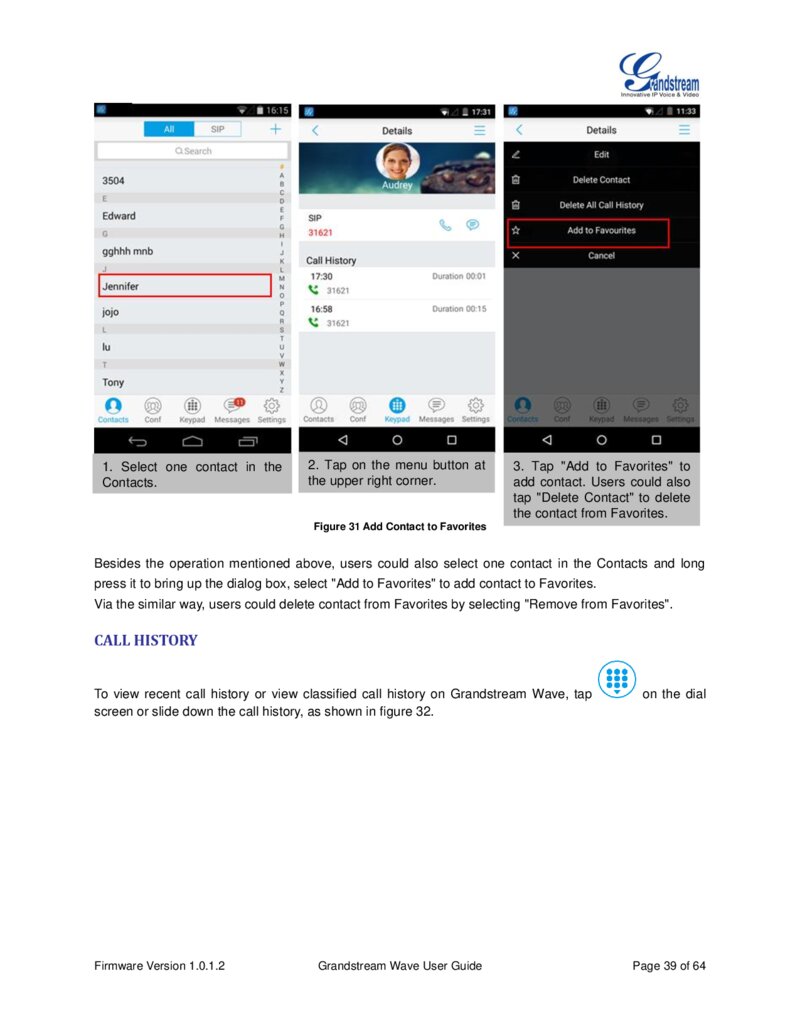
1. Select one contact in the Contacts. pictured at right.
2. Tap on the menu button at the upper right corner.
3. Tap "Add to Favorites" to add contact. Users could also tap "Delete Contact" to delete the contact from Favorites.
Figure 31 Add Contact to Favorites Besides the operation mentioned above, users could also select one contact in the Contacts and long press it to bring up the dialog box, select "Add to Favorites" to add contact to Favorites.
Via the similar way, users could delete contact from Favorites by selecting "Remove from Favorites".
CALL HISTORY
To view recent call history or view classified call history on Grandstream Wave, tap screen or slide down the call history, as shown in figure 32.
Firmware Version 1.0.1.2 Grandstream Wave User Guide on the dial Page 39 of 64
Página 41 — gswave_user_manual-1
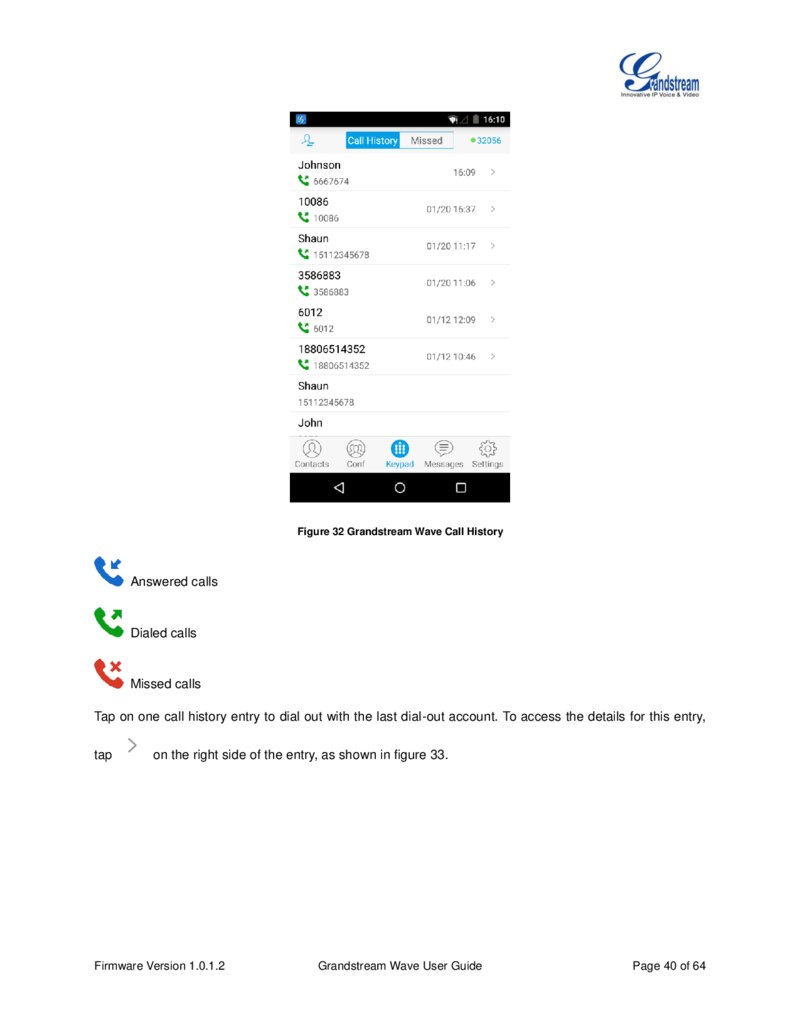
Figure 32 Grandstream Wave Call History Answered calls Dialed calls Missed calls Tap on one call history entry to dial out with the last dial-out account. To access the details for this entry, tap on the right side of the entry, as shown in figure 33.
Firmware Version 1.0.1.2 Grandstream Wave User Guide Page 40 of 64
Página 42 — gswave_user_manual-1
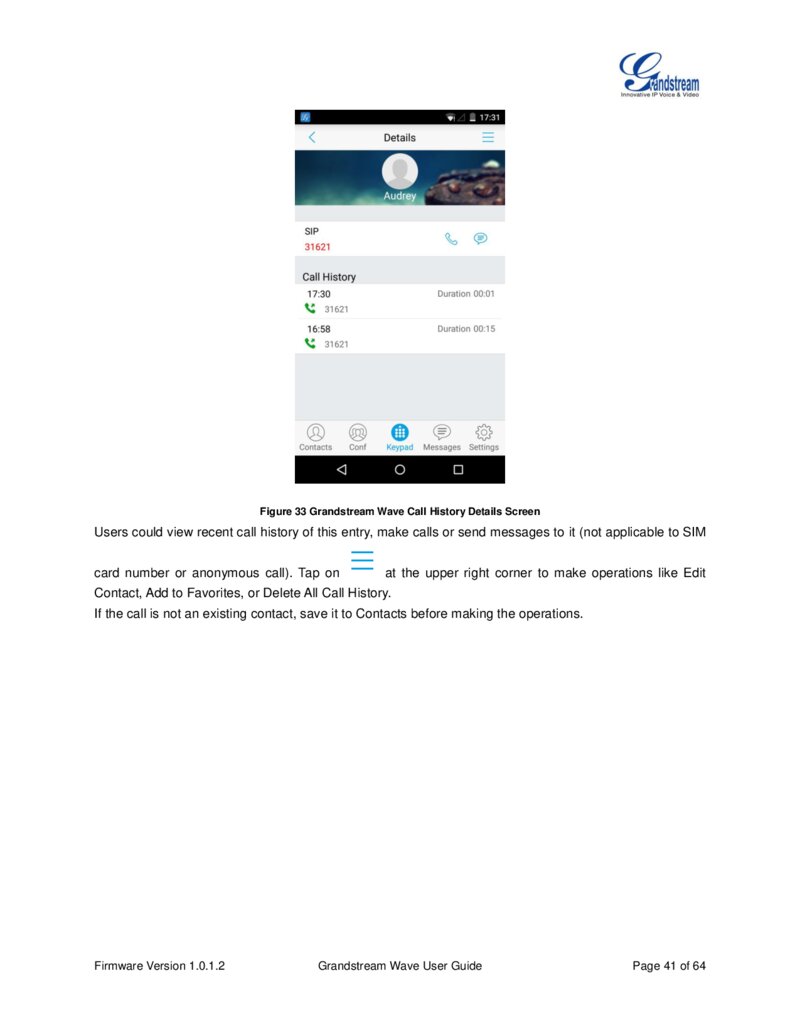
Figure 33 Grandstream Wave Call History Details Screen Users could view recent call history of this entry, make calls or send messages to it (not applicable to SIM card number or anonymous call). Tap on at the upper right corner to make operations like Edit Contact, Add to Favorites, or Delete All Call History.
If the call is not an existing contact, save it to Contacts before making the operations.
Firmware Version 1.0.1.2 Grandstream Wave User Guide Page 41 of 64
Página 43 — gswave_user_manual-1
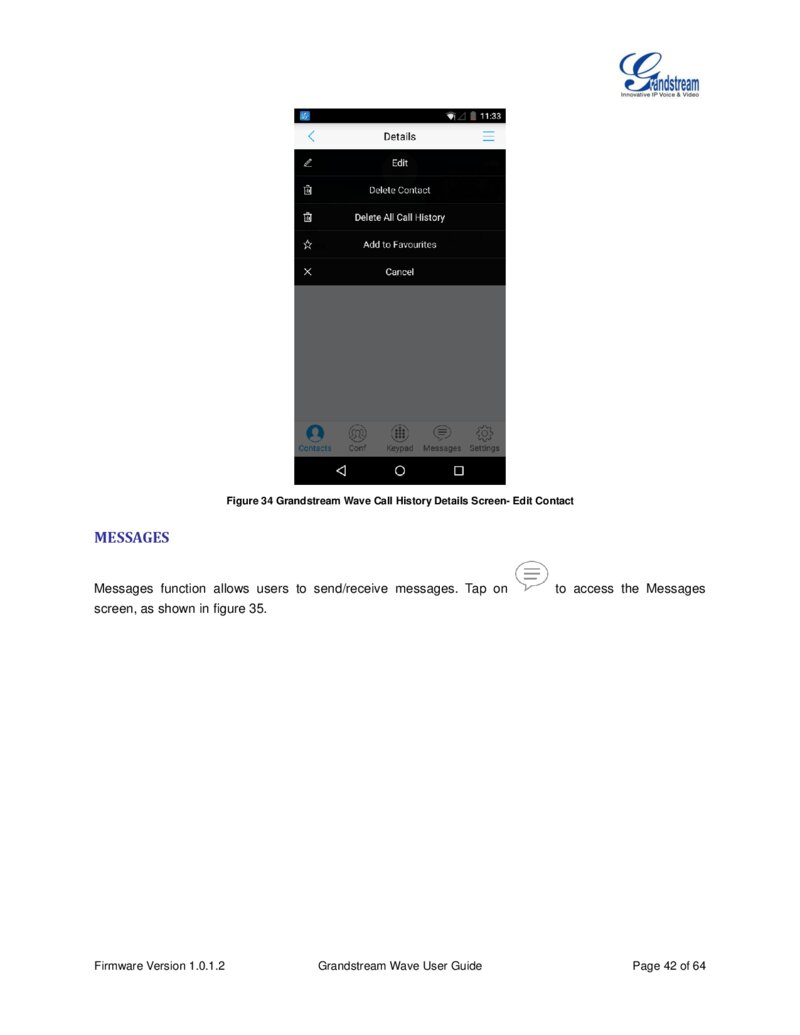
Figure 34 Grandstream Wave Call History Details Screen- Edit Contact
MESSAGES
Messages function allows users to send/receive messages. Tap on to access the Messages screen, as shown in figure 35.
Firmware Version 1.0.1.2 Grandstream Wave User Guide Page 42 of 64
Página 44 — gswave_user_manual-1
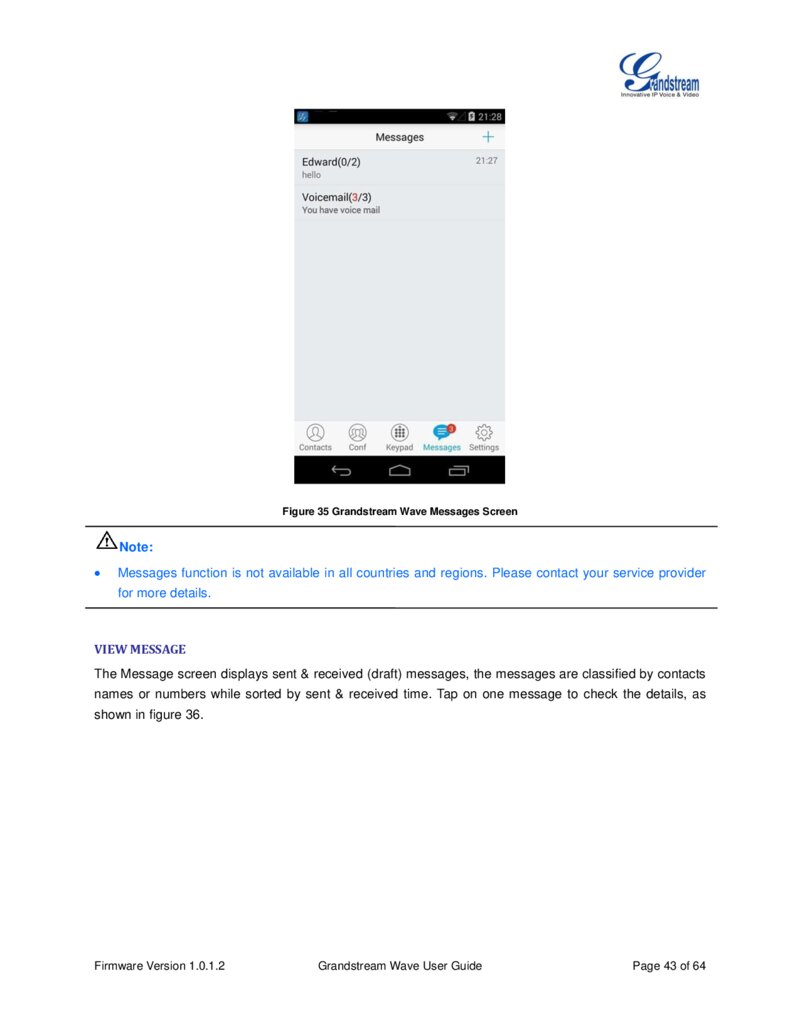
Figure 35 Grandstream Wave Messages Screen Note:
Messages function is not available in all countries and regions. Please contact your service provider for more details.
VIEW MESSAGE
The Message screen displays sent & received (draft) messages, the messages are classified by contacts names or numbers while sorted by sent & received time. Tap on one message to check the details, as shown in figure 36.
Firmware Version 1.0.1.2 Grandstream Wave User Guide Page 43 of 64
Página 45 — gswave_user_manual-1
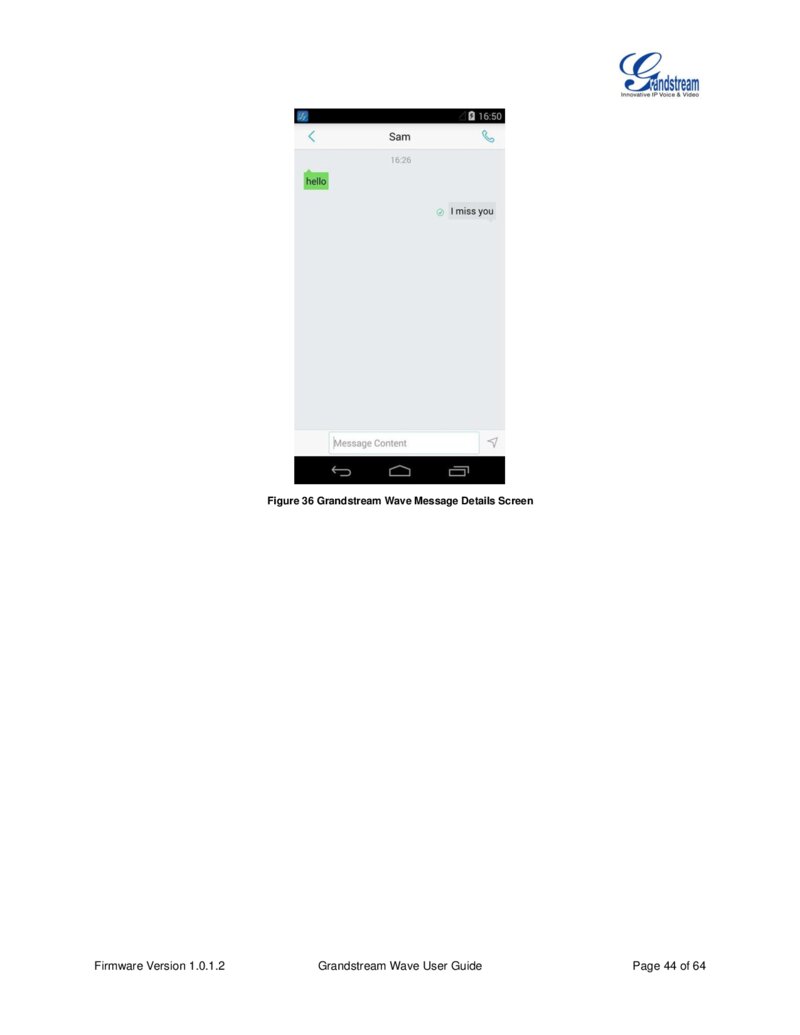
Figure 36 Grandstream Wave Message Details Screen Firmware Version 1.0.1.2 Grandstream Wave User Guide Page 44 of 64
Página 46 — gswave_user_manual-1
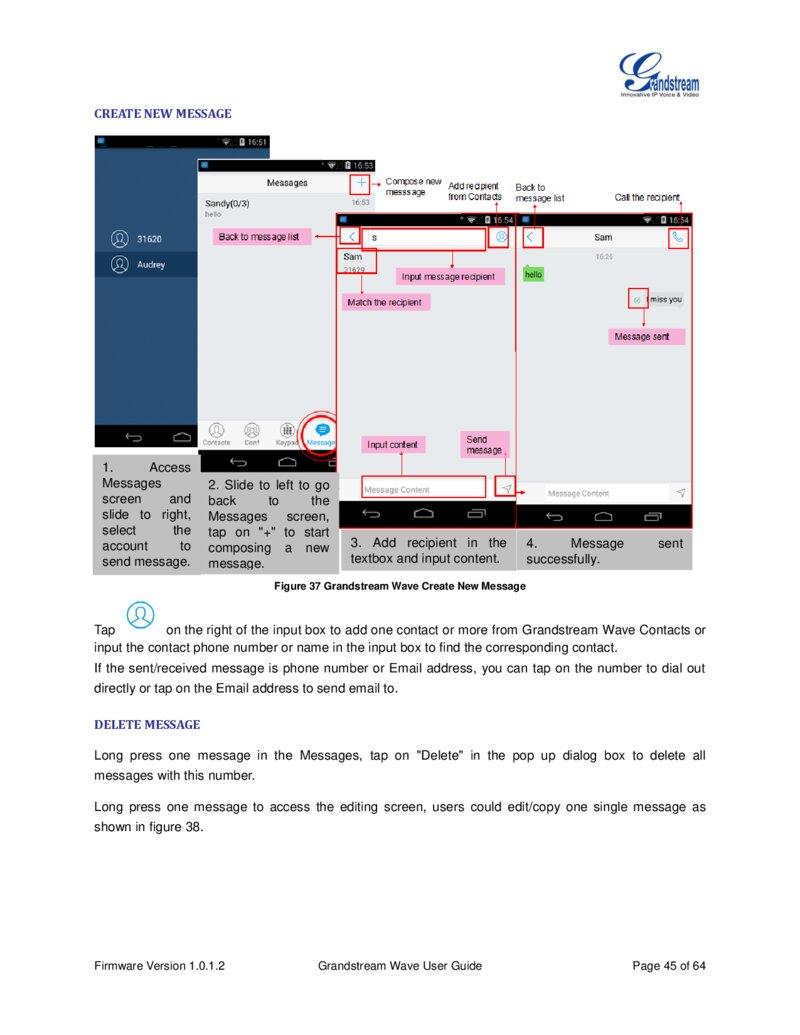
CREATE NEW MESSAGE
1. Access Messages screen and slide to right, select the account to send message.
2. Slide to left to go back to the Messages screen, tap on "+" to start composing a new message.
3. Add recipient in the textbox and input content.
4. Message successfully. sent Figure 37 Grandstream Wave Create New Message Tap on the right of the input box to add one contact or more from Grandstream Wave Contacts or input the contact phone number or name in the input box to find the corresponding contact.
If the sent/received message is phone number or Email address, you can tap on the number to dial out directly or tap on the Email address to send email to.
DELETE MESSAGE
Long press one message in the Messages, tap on "Delete" in the pop up dialog box to delete all messages with this number.
Long press one message to access the editing screen, users could edit/copy one single message as shown in figure 38.
Firmware Version 1.0.1.2 Grandstream Wave User Guide Page 45 of 64
Página 47 — gswave_user_manual-1
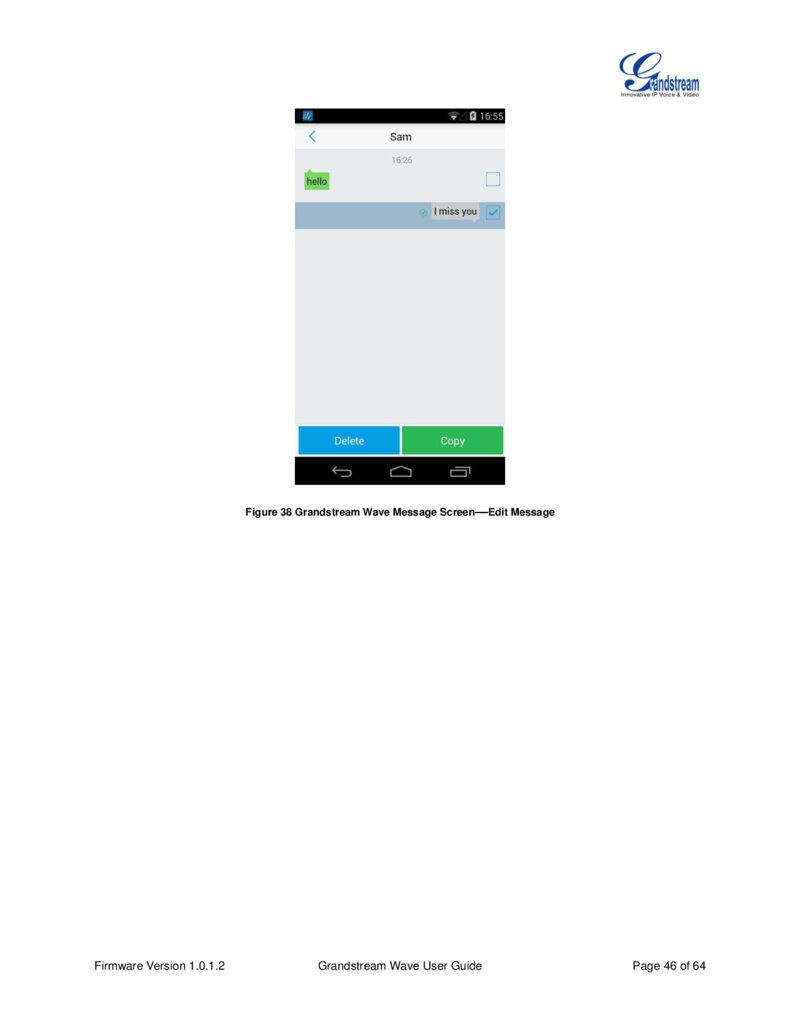
Figure 38 Grandstream Wave Message Screen—Edit Message Firmware Version 1.0.1.2 Grandstream Wave User Guide Page 46 of 64
Página 48 — gswave_user_manual-1
SETTINGS
For the first time using Grandstream Wave, go to the Settings screen to complete the basic settings, including Account Settings, Call Settings, Audio Codec Settings, Network Settings, etc.
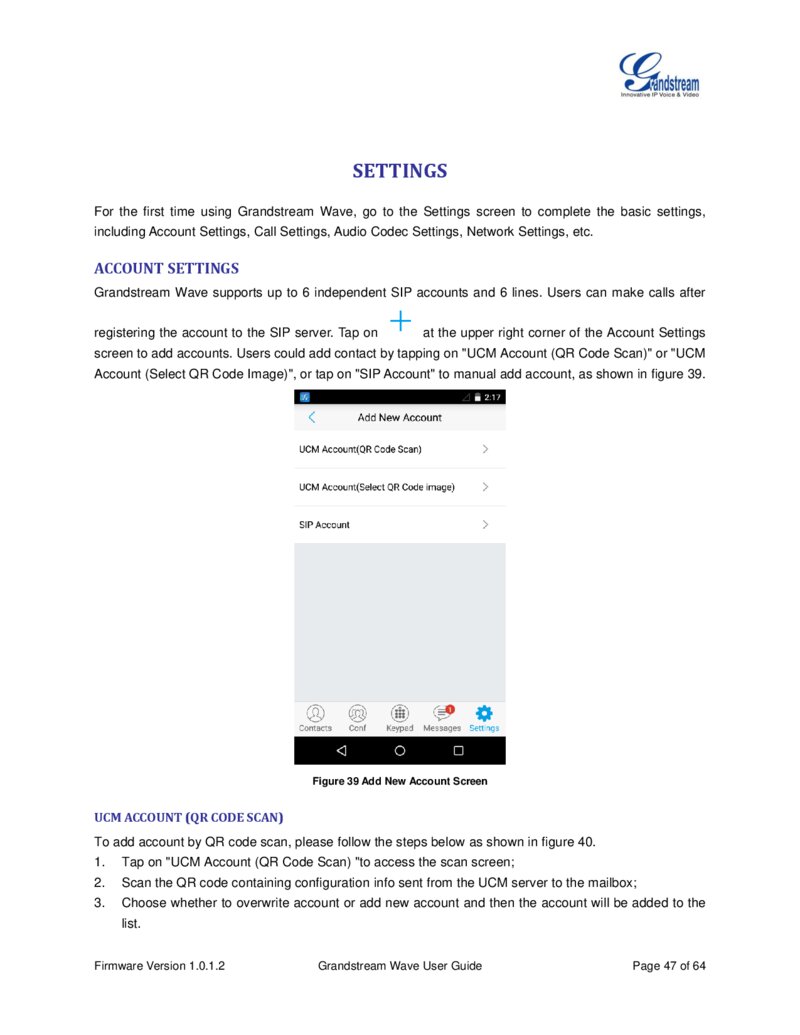
ACCOUNT SETTINGS
Grandstream Wave supports up to 6 independent SIP accounts and 6 lines. Users can make calls after registering the account to the SIP server. Tap on at the upper right corner of the Account Settings screen to add accounts. Users could add contact by tapping on "UCM Account (QR Code Scan)" or "UCM Account (Select QR Code Image)", or tap on "SIP Account" to manual add account, as shown in figure 39.
Figure 39 Add New Account Screen
UCM ACCOUNT (QR CODE SCAN)
To add account by QR code scan, please follow the steps below as shown in figure 40.
1. Tap on "UCM Account (QR Code Scan) "to access the scan screen; 2.
Scan the QR code containing configuration info sent from the UCM server to the mailbox; 3.
Choose whether to overwrite account or add new account and then the account will be added to the list.
Firmware Version 1.0.1.2 Grandstream Wave User Guide Page 47 of 64
Página 49 — gswave_user_manual-1
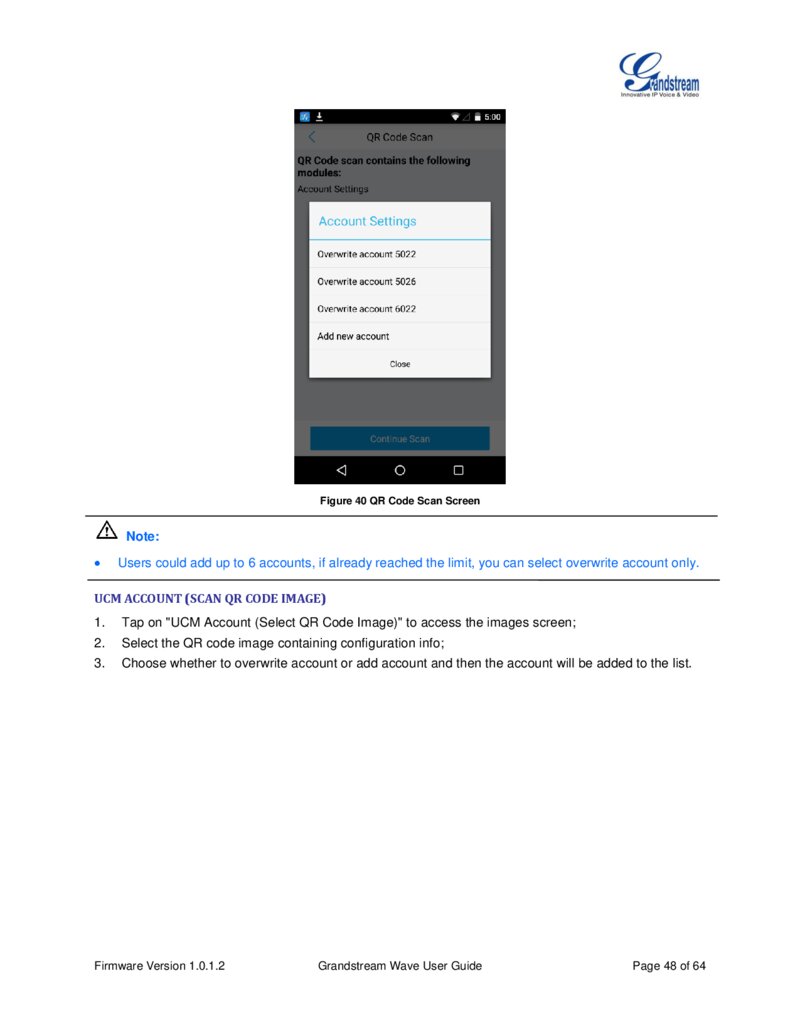
Figure 40 QR Code Scan Screen Note: Users could add up to 6 accounts, if already reached the limit, you can select overwrite account only.
UCM ACCOUNT (SCAN QR CODE IMAGE)
1. Tap on "UCM Account (Select QR Code Image)" to access the images screen; 2.
Select the QR code image containing configuration info; 3.
Choose whether to overwrite account or add account and then the account will be added to the list.
Firmware Version 1.0.1.2 Grandstream Wave User Guide Page 48 of 64
Página 50 — gswave_user_manual-1
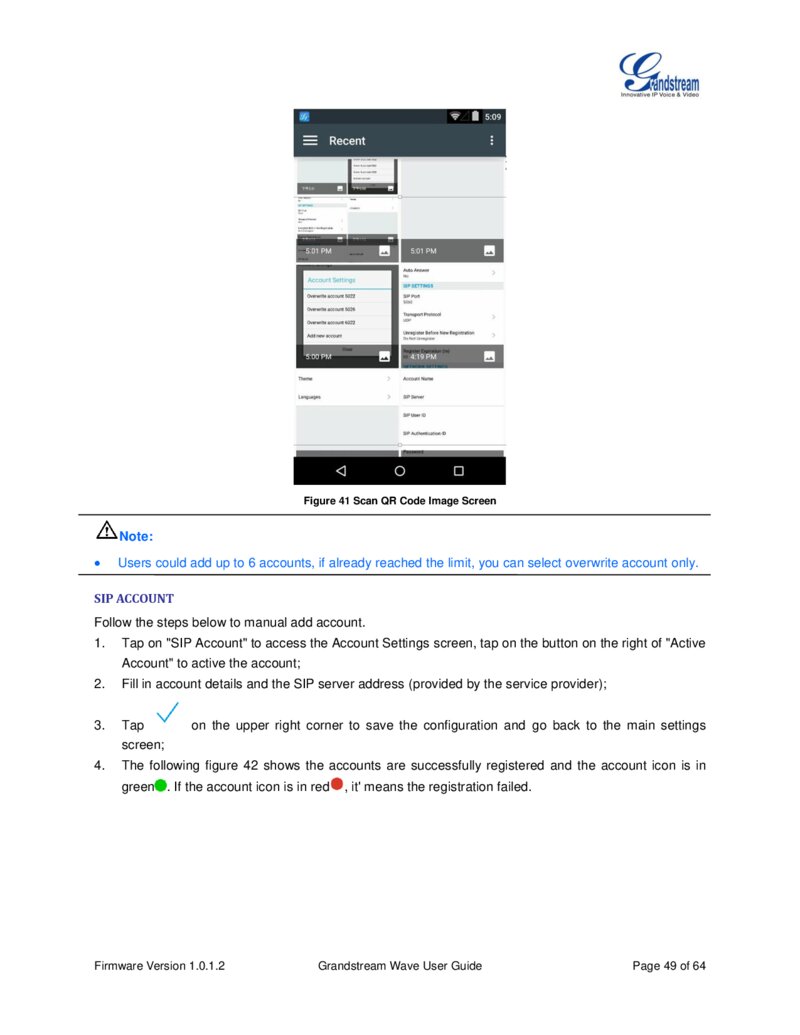
Figure 41 Scan QR Code Image Screen Note:
Users could add up to 6 accounts, if already reached the limit, you can select overwrite account only.
SIP ACCOUNT
Follow the steps below to manual add account.
1. Tap on "SIP Account" to access the Account Settings screen, tap on the button on the right of "Active Account" to active the account; 2.
Fill in account details and the SIP server address (provided by the service provider); 3.
Tap screen; 4. The following figure 42 shows the accounts are successfully registered and the account icon is in on the upper right corner to save the configuration and go back to the main settings green . If the account icon is in red Firmware Version 1.0.1.2 , it' means the registration failed.
Grandstream Wave User Guide Page 49 of 64
Este PDF tiene 65 páginas. Se muestran las primeras 50.